Workbot for Microsoft Teams triggers
Workbot for Microsoft Teams has the following triggers:
New command trigger
Workbot commands allow you to trigger recipes from Microsoft Teams. These recipes can then perform actions in your apps (for example, creating new ServiceNow tickets, or listing Salesforce opportunities).
This means you can from perform actions in your apps from within Microsoft Teams.
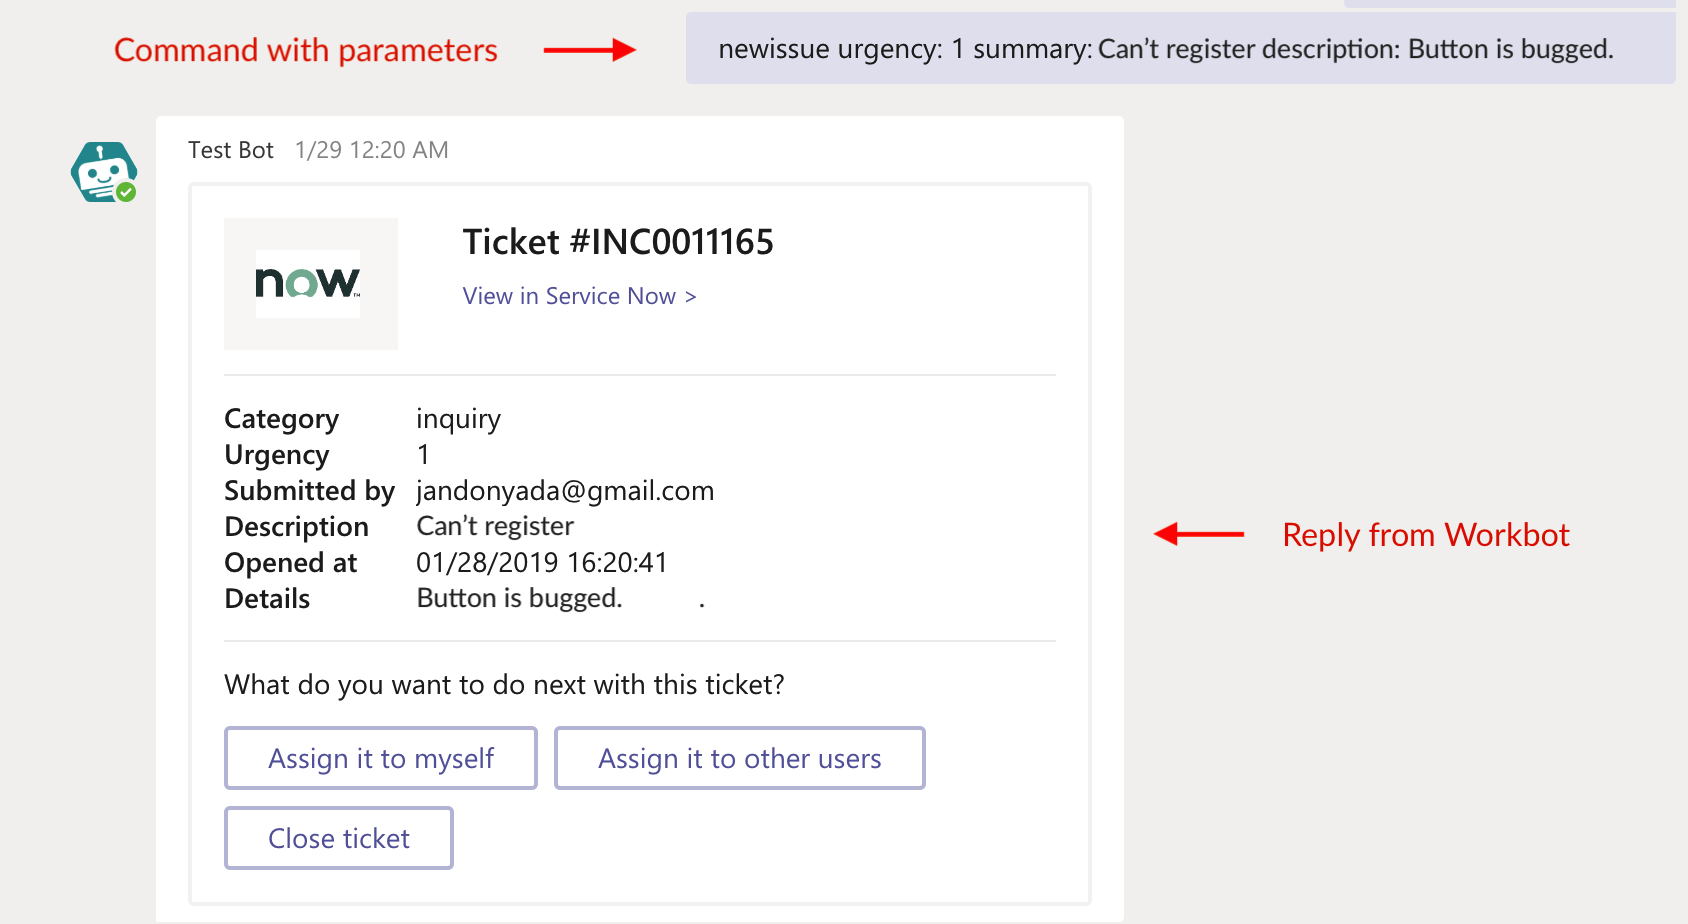 Sending a 'newissue' command with additional parameters in Teams, then receiving a reply
When a command is sent to Workbot in Microsoft Teams, it will trigger the Workbot recipe and execute its actions.
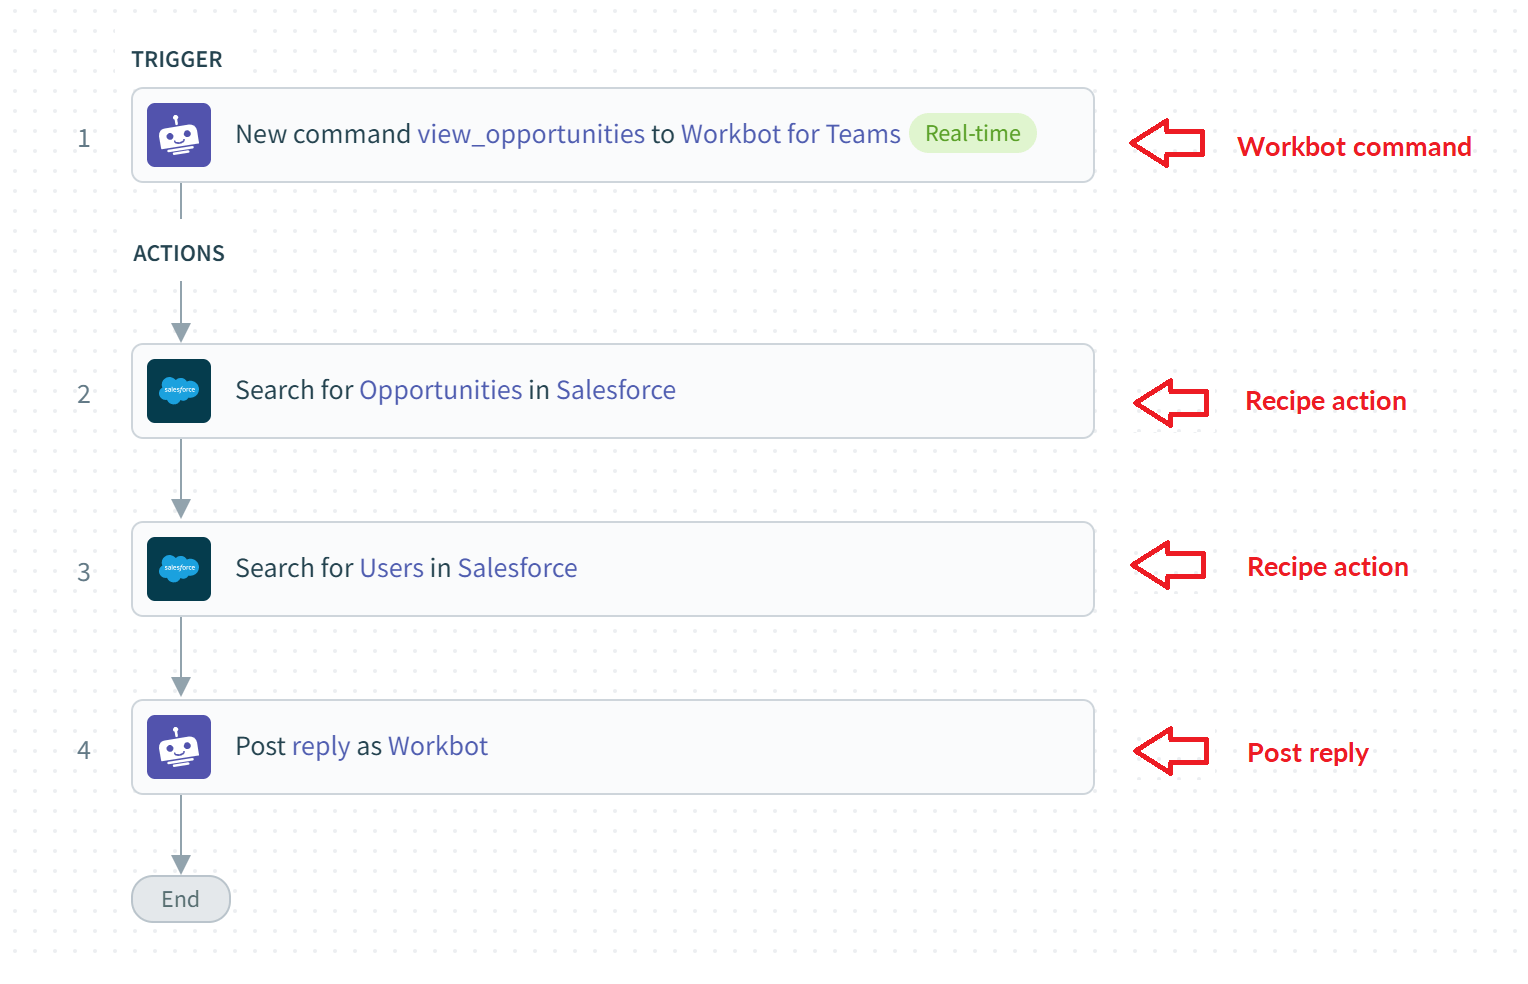 A Workbot recipe with a Workbot command trigger
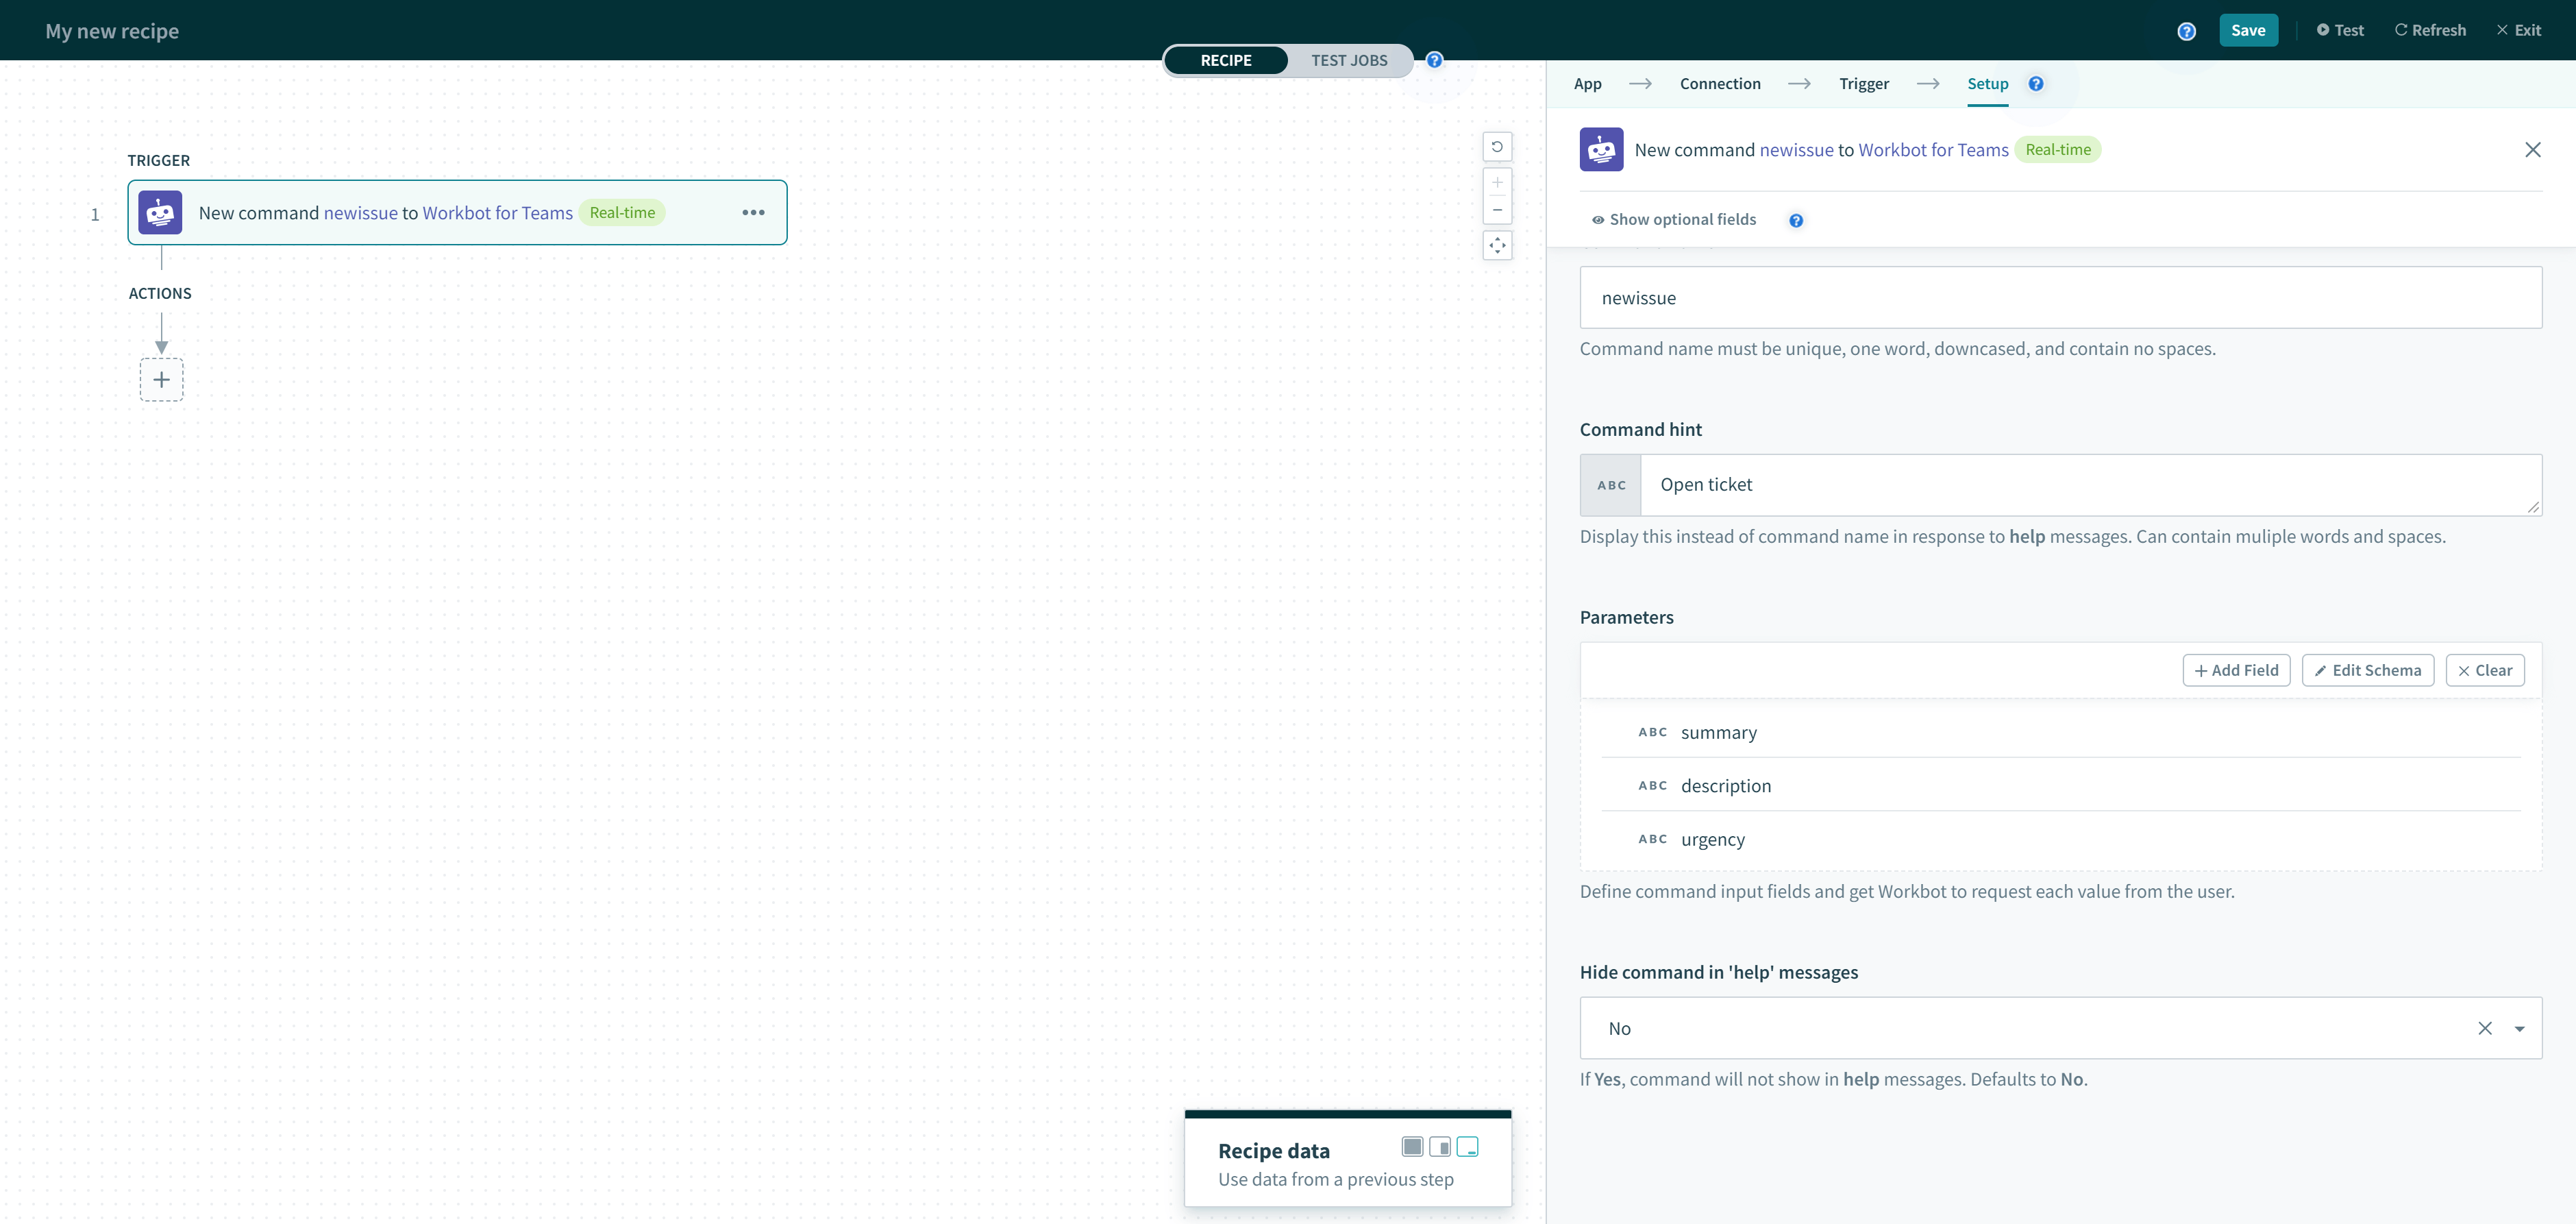
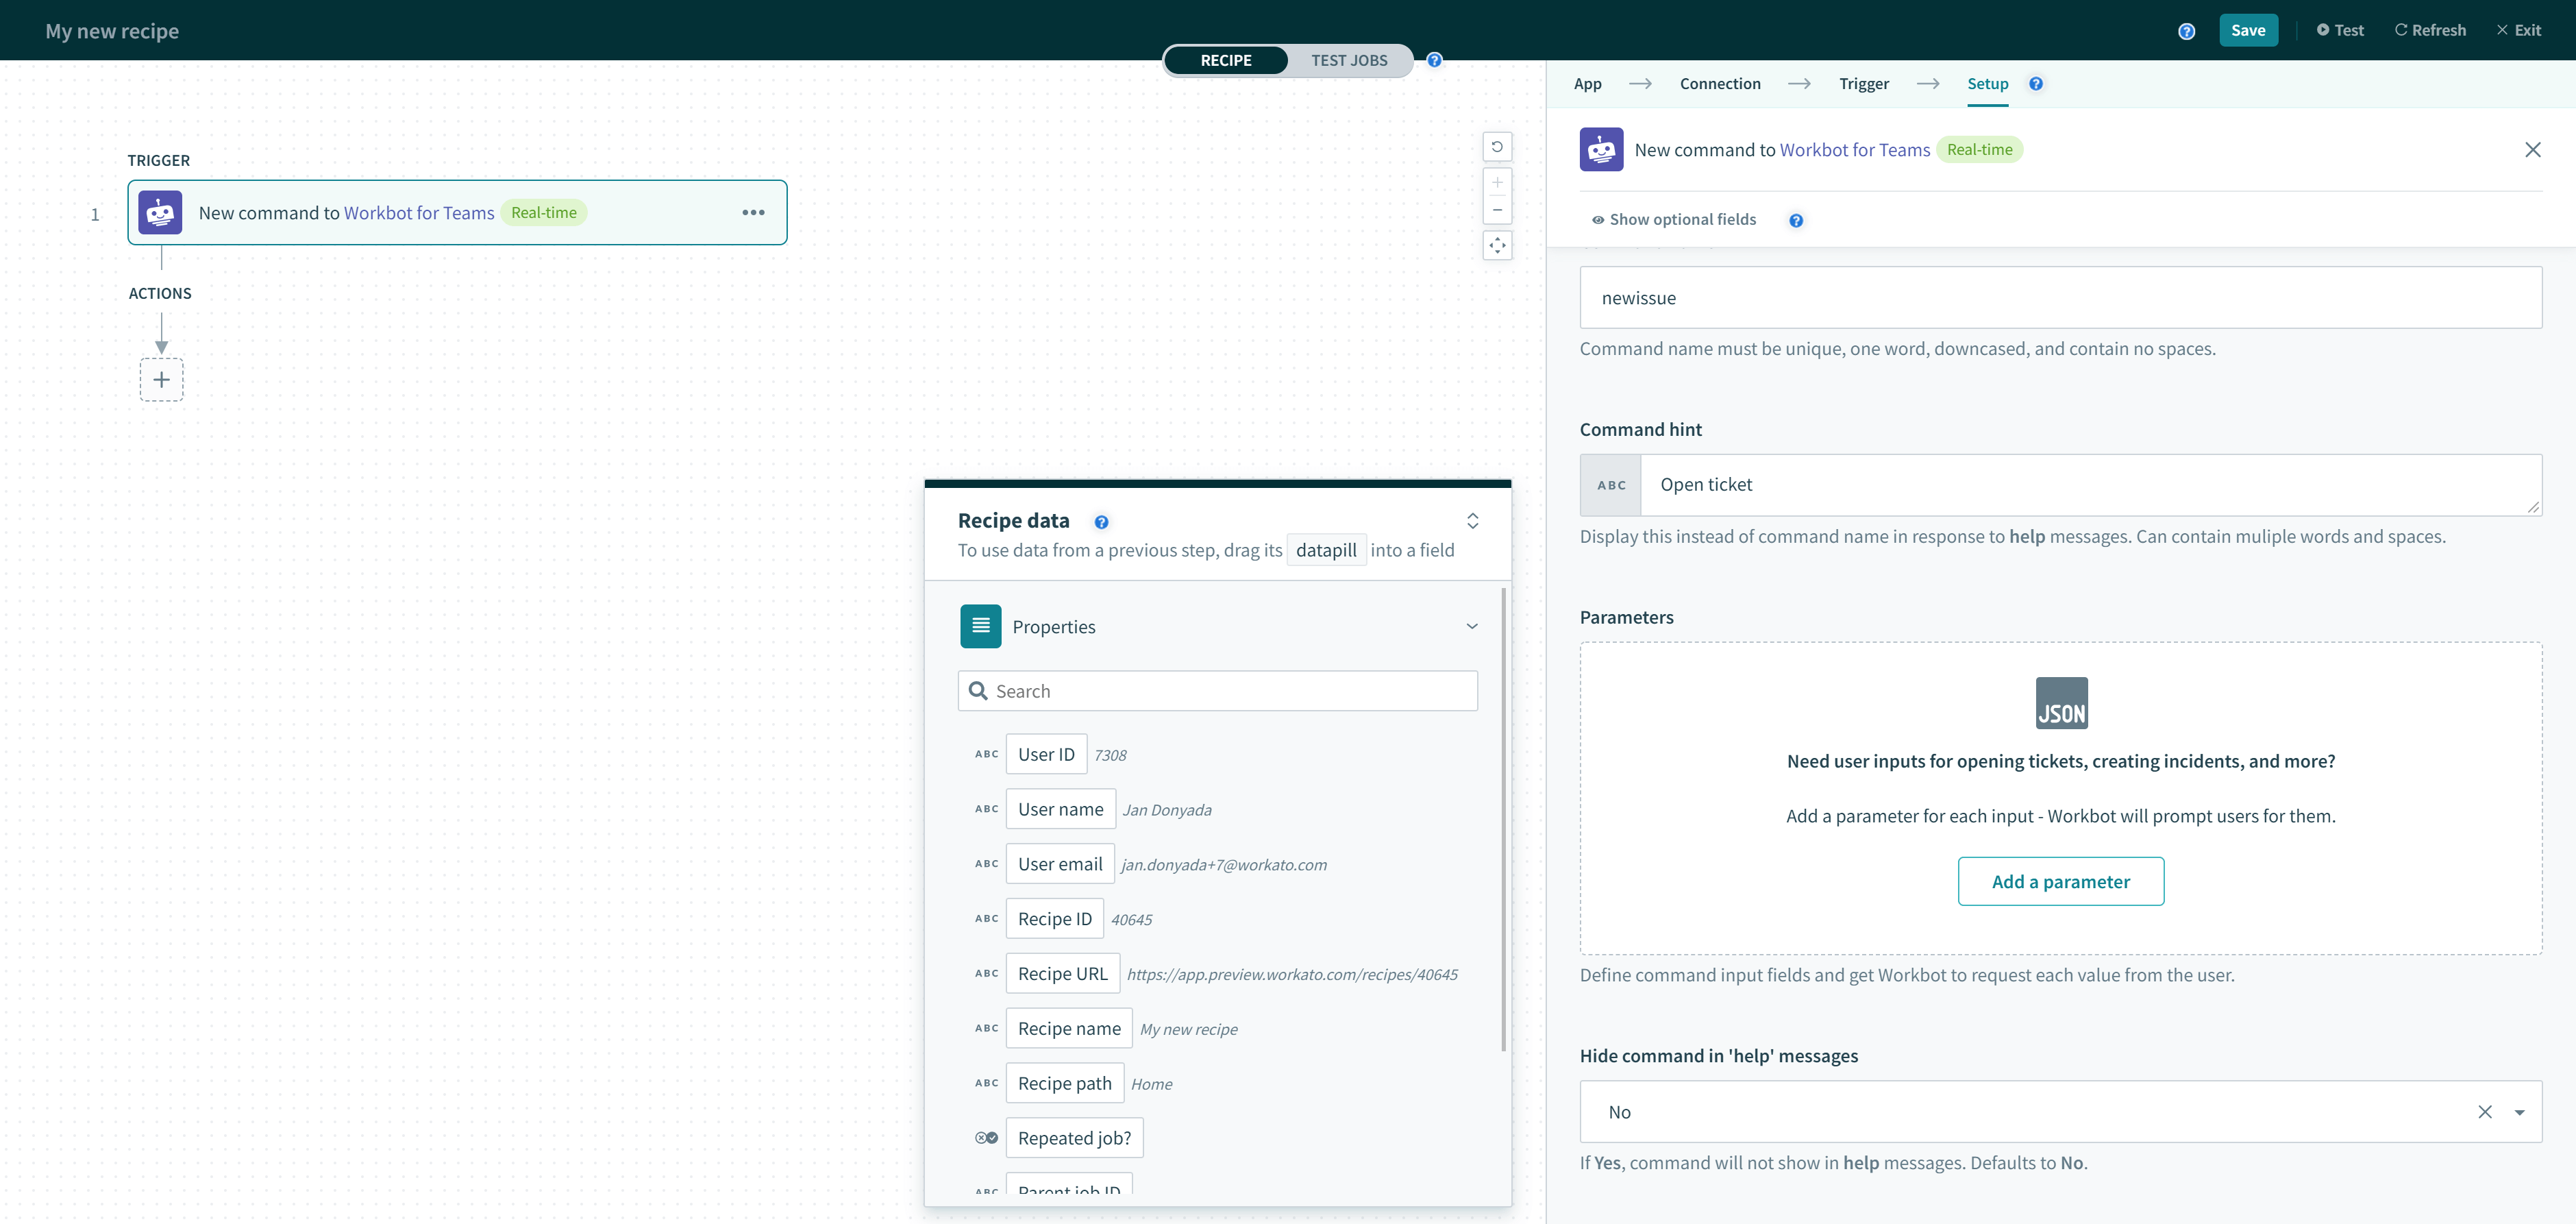
Configuring the command
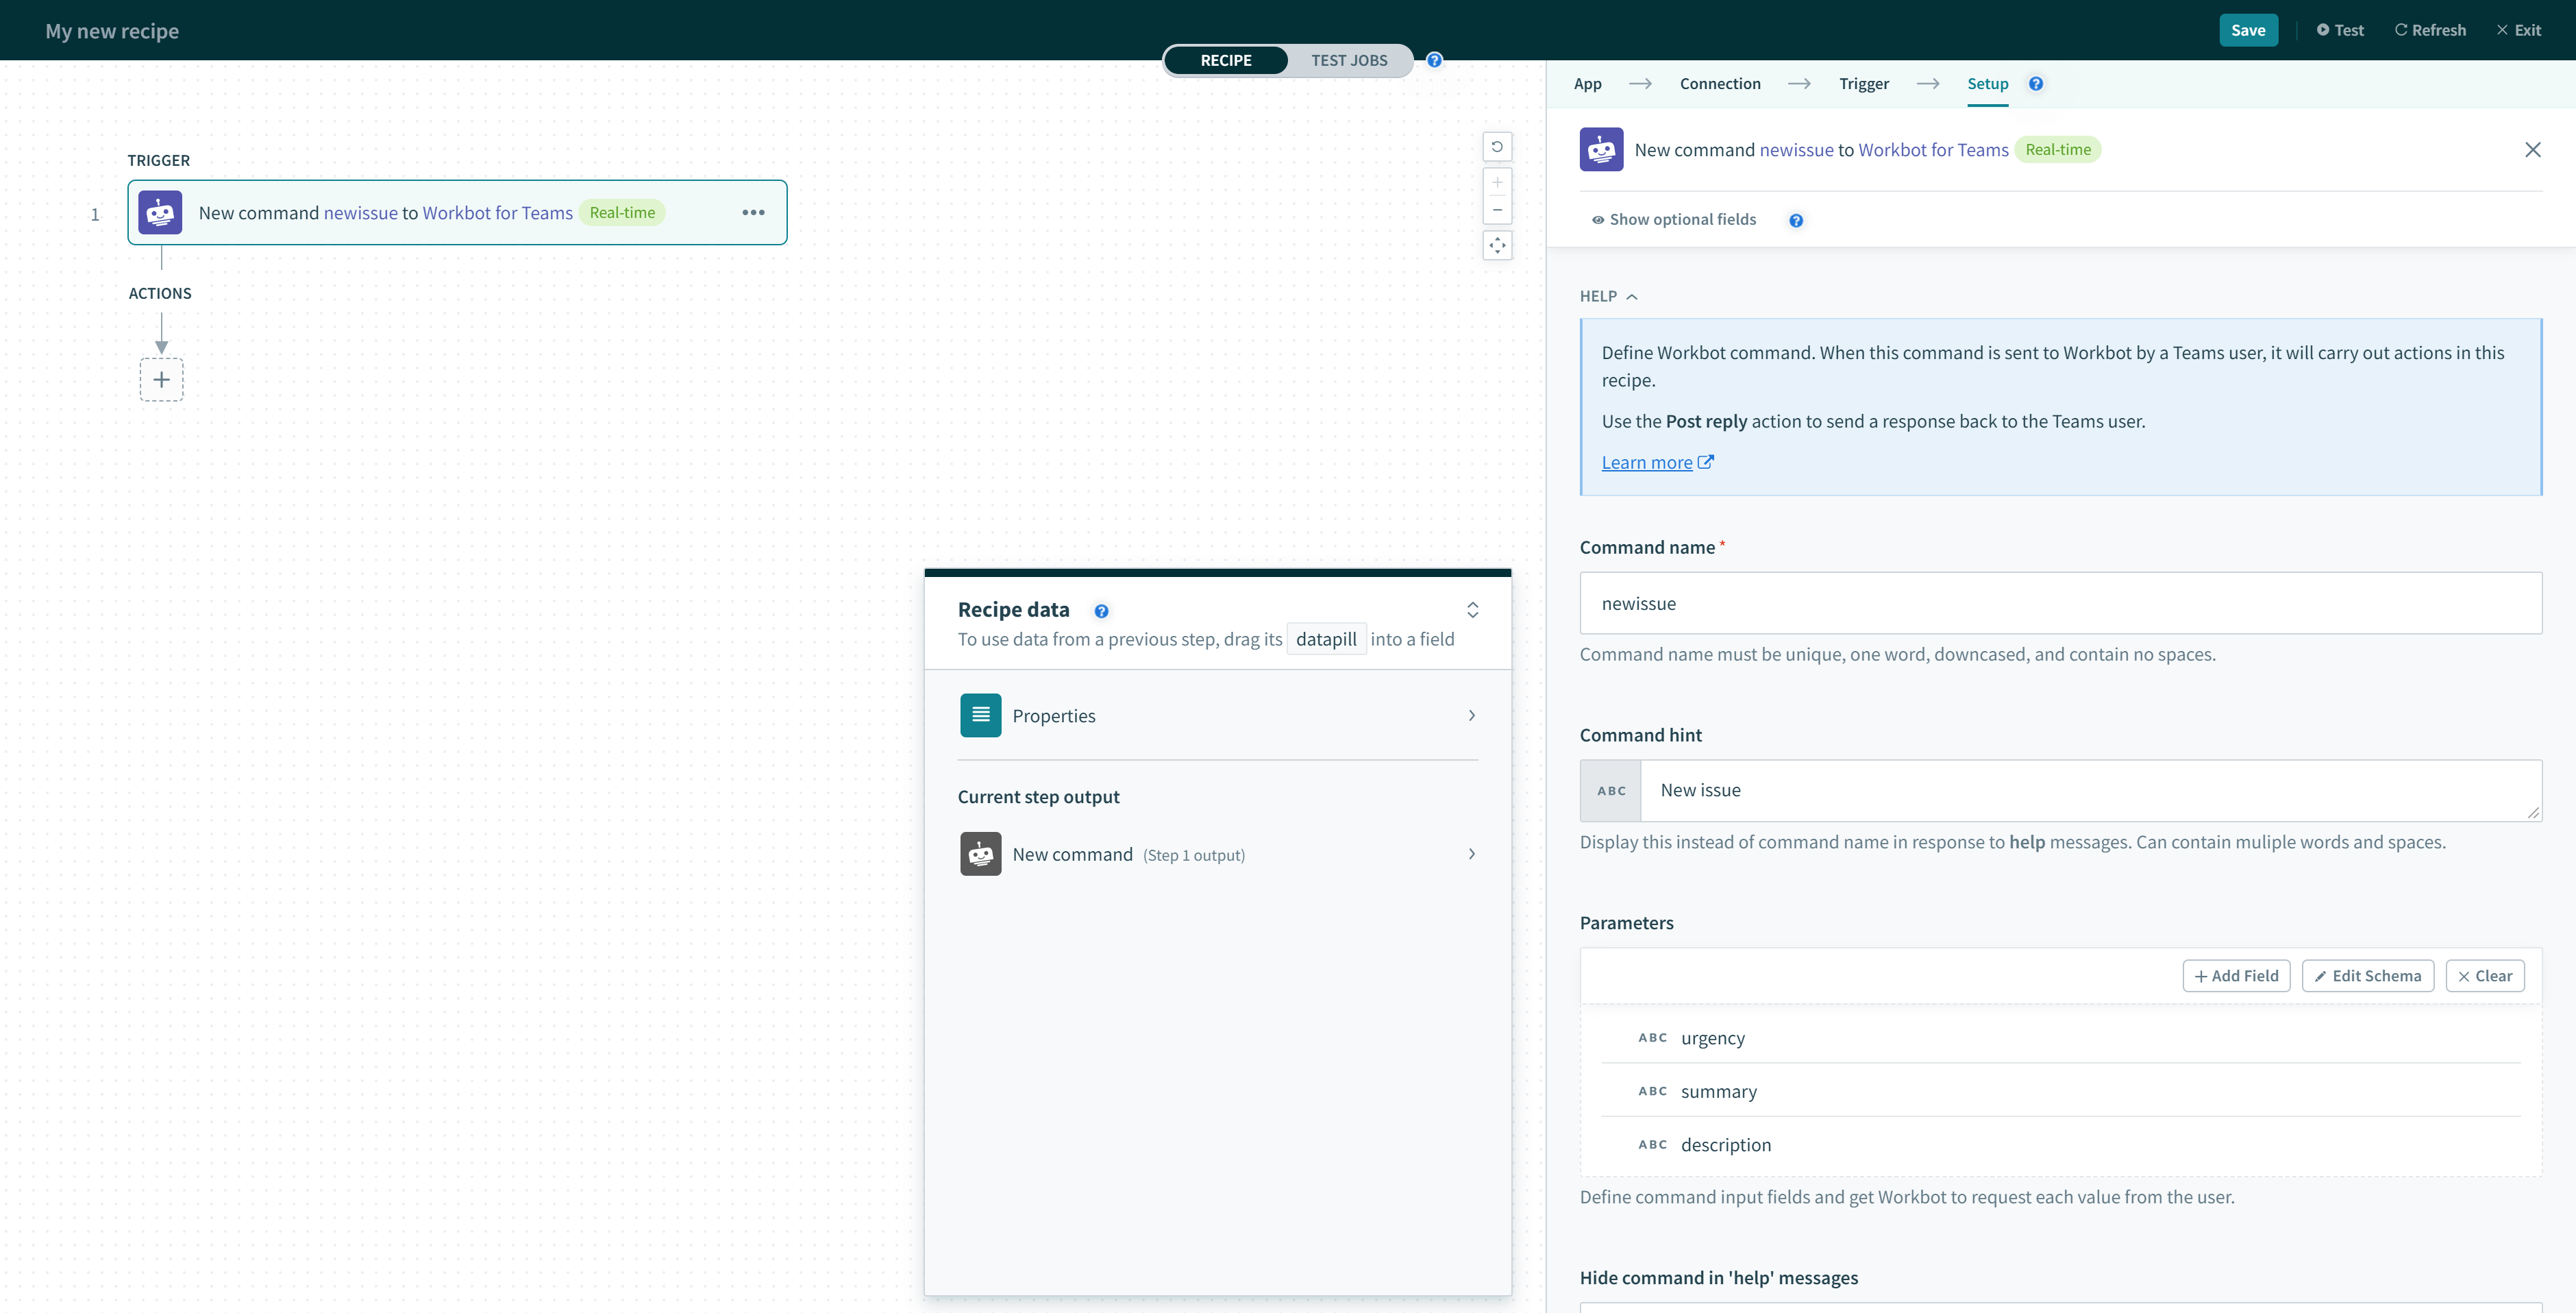 Example 'newissue' command
Input
The table below lists the input fields in the trigger and what they do.
| Input field | Description |
|---|---|
| Command name | Name of the command. |
| Parameters | Parameter can store additional data that can be used as datapills in follow-up recipe actions. |
| Command hint | Display this instead of command name in response to help messages. |
| Hidden command | If Yes, command will not show up as a command in help messages. Defaults to No. |
Command name
Workbot commands can invoke their recipes by:
- Sending the command name in a direct message to Workbot, for example, newissue
- Sending the command name in a channel and tagging Workbot, for example, @workbot newissue
- Submitting a button with the command name configured:
 A button can be configured to invoke a Workbot command of another recipe
 The 'Create issue' button invokes the 'newissue' command and executes the recipe when submitted
Parameters
Each parameter can store additional data that can be used as datapills in follow-up recipe actions.
For example, to create an incident in ServiceNow, you may want to prompt users for additional info like Urgency, Summary, and Description. By adding Urgency, Summary, and Description as parameters, Workbot will open a task module and prompt the user for each parameter.
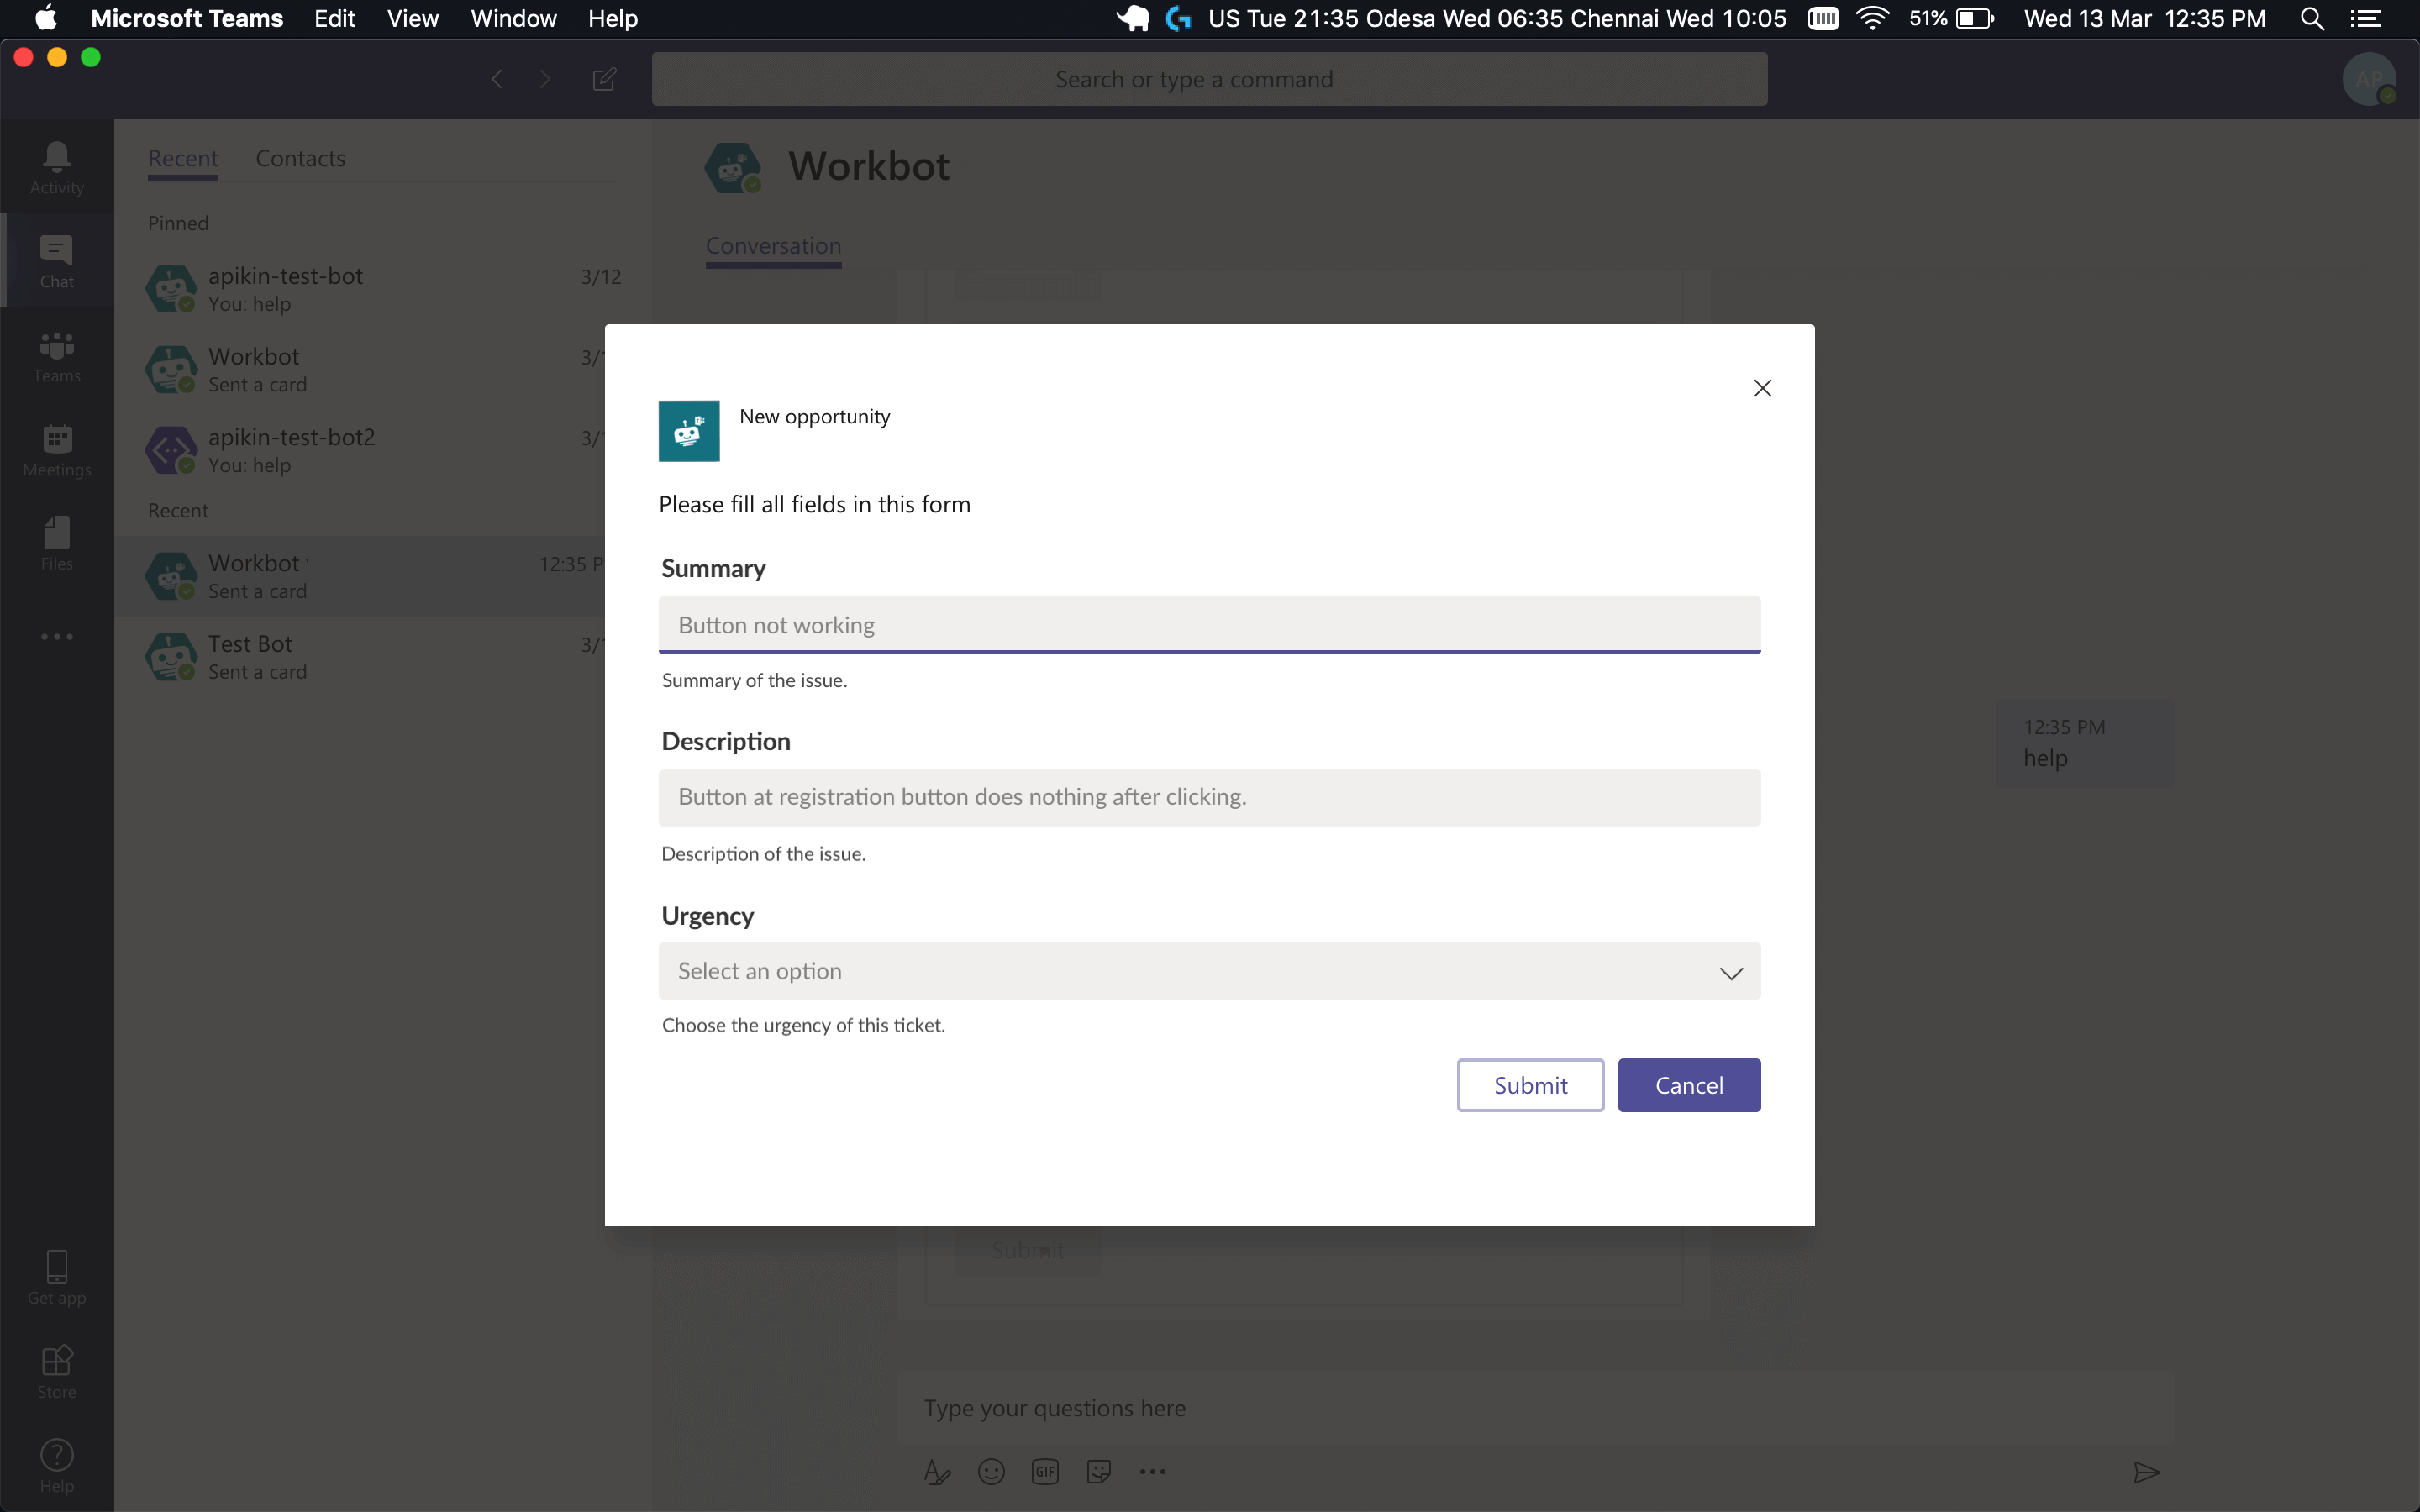 Workbot can ask users for info if you specify additional parameters in your command
Users can also skip the prompts by supplying the parameters together with the command.
Sending a 'newissue' command with additional parameters Urgency, Summary, and Description
Defining parameters
 3 parameters configured for the 'newissue' command
When you define parameters, Workbot opens a task module to collect each parameter's value from the user.
To add a parameter, select the +Add parameter button under the Parameters section of a Workbot command trigger.
 Adding a new parameter
By configuring the parameter, you can control how the users interact with the parameter in the task module.
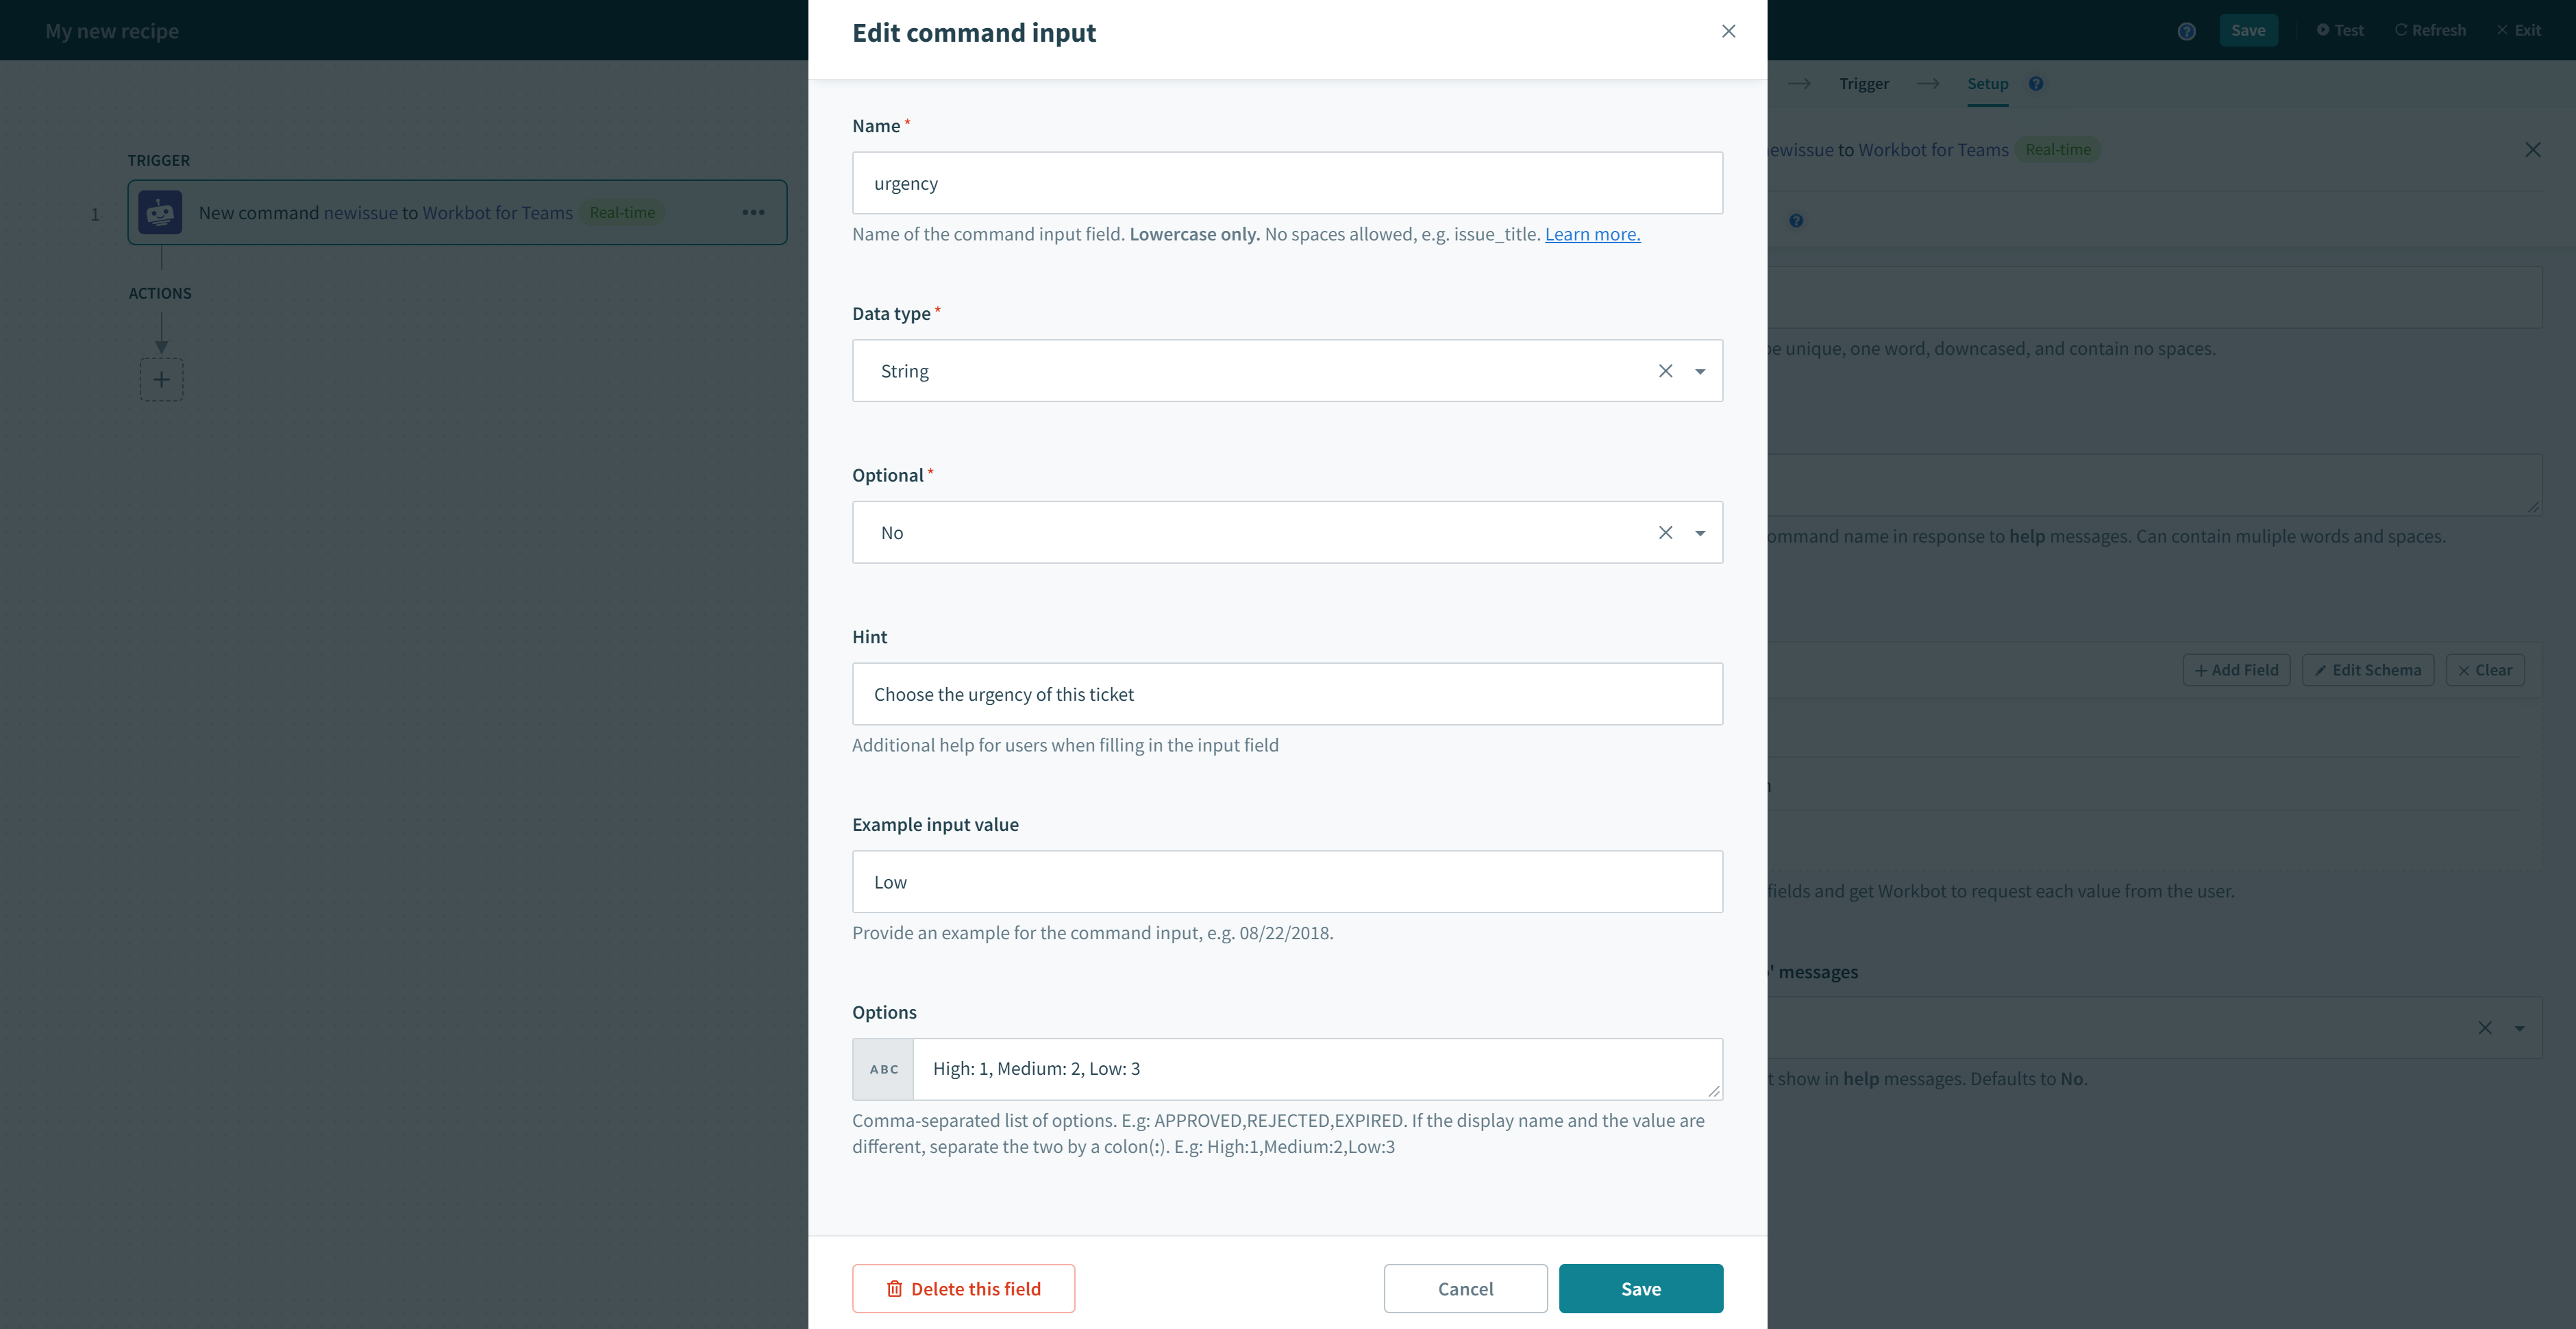 Configuring a parameter
The table below describes in further detail what each parameter configuration field does.
| Input field | Description |
|---|---|
| Name | Name of the parameter. This is the name you use to reference the parameter in:
|
| Data type | Data type of the parameter. Currently supports the following data types:
The data type will influence the input type presented to the user in a task modules. For example, if Date is chosen, a date picker will be presented to the user.The file parameter is only available for Enterprise Workbot. Learn more. |
| Optional? | If set to Yes, users can skip this input. If set to No, users are required to provide this input. |
| Hint | Hints are displayed just below the input field for users when filling in the input field. |
| Example input value | Displays a placeholder for the field in the task module. Useful in giving the user a sense of what the requested input should look like, as well as the desired format. |
| Visible? | If Yes, command will not show up in task modules. Useful if the parameter is a record ID that is not human-readable. Defaults to No. |
| Options | Comma-separated list of options, for example, APPROVED, REJECTED, EXPIRED. If the display name and the value are different, separate the two by a colon, for example, High:1,Medium:2,Low:3. |
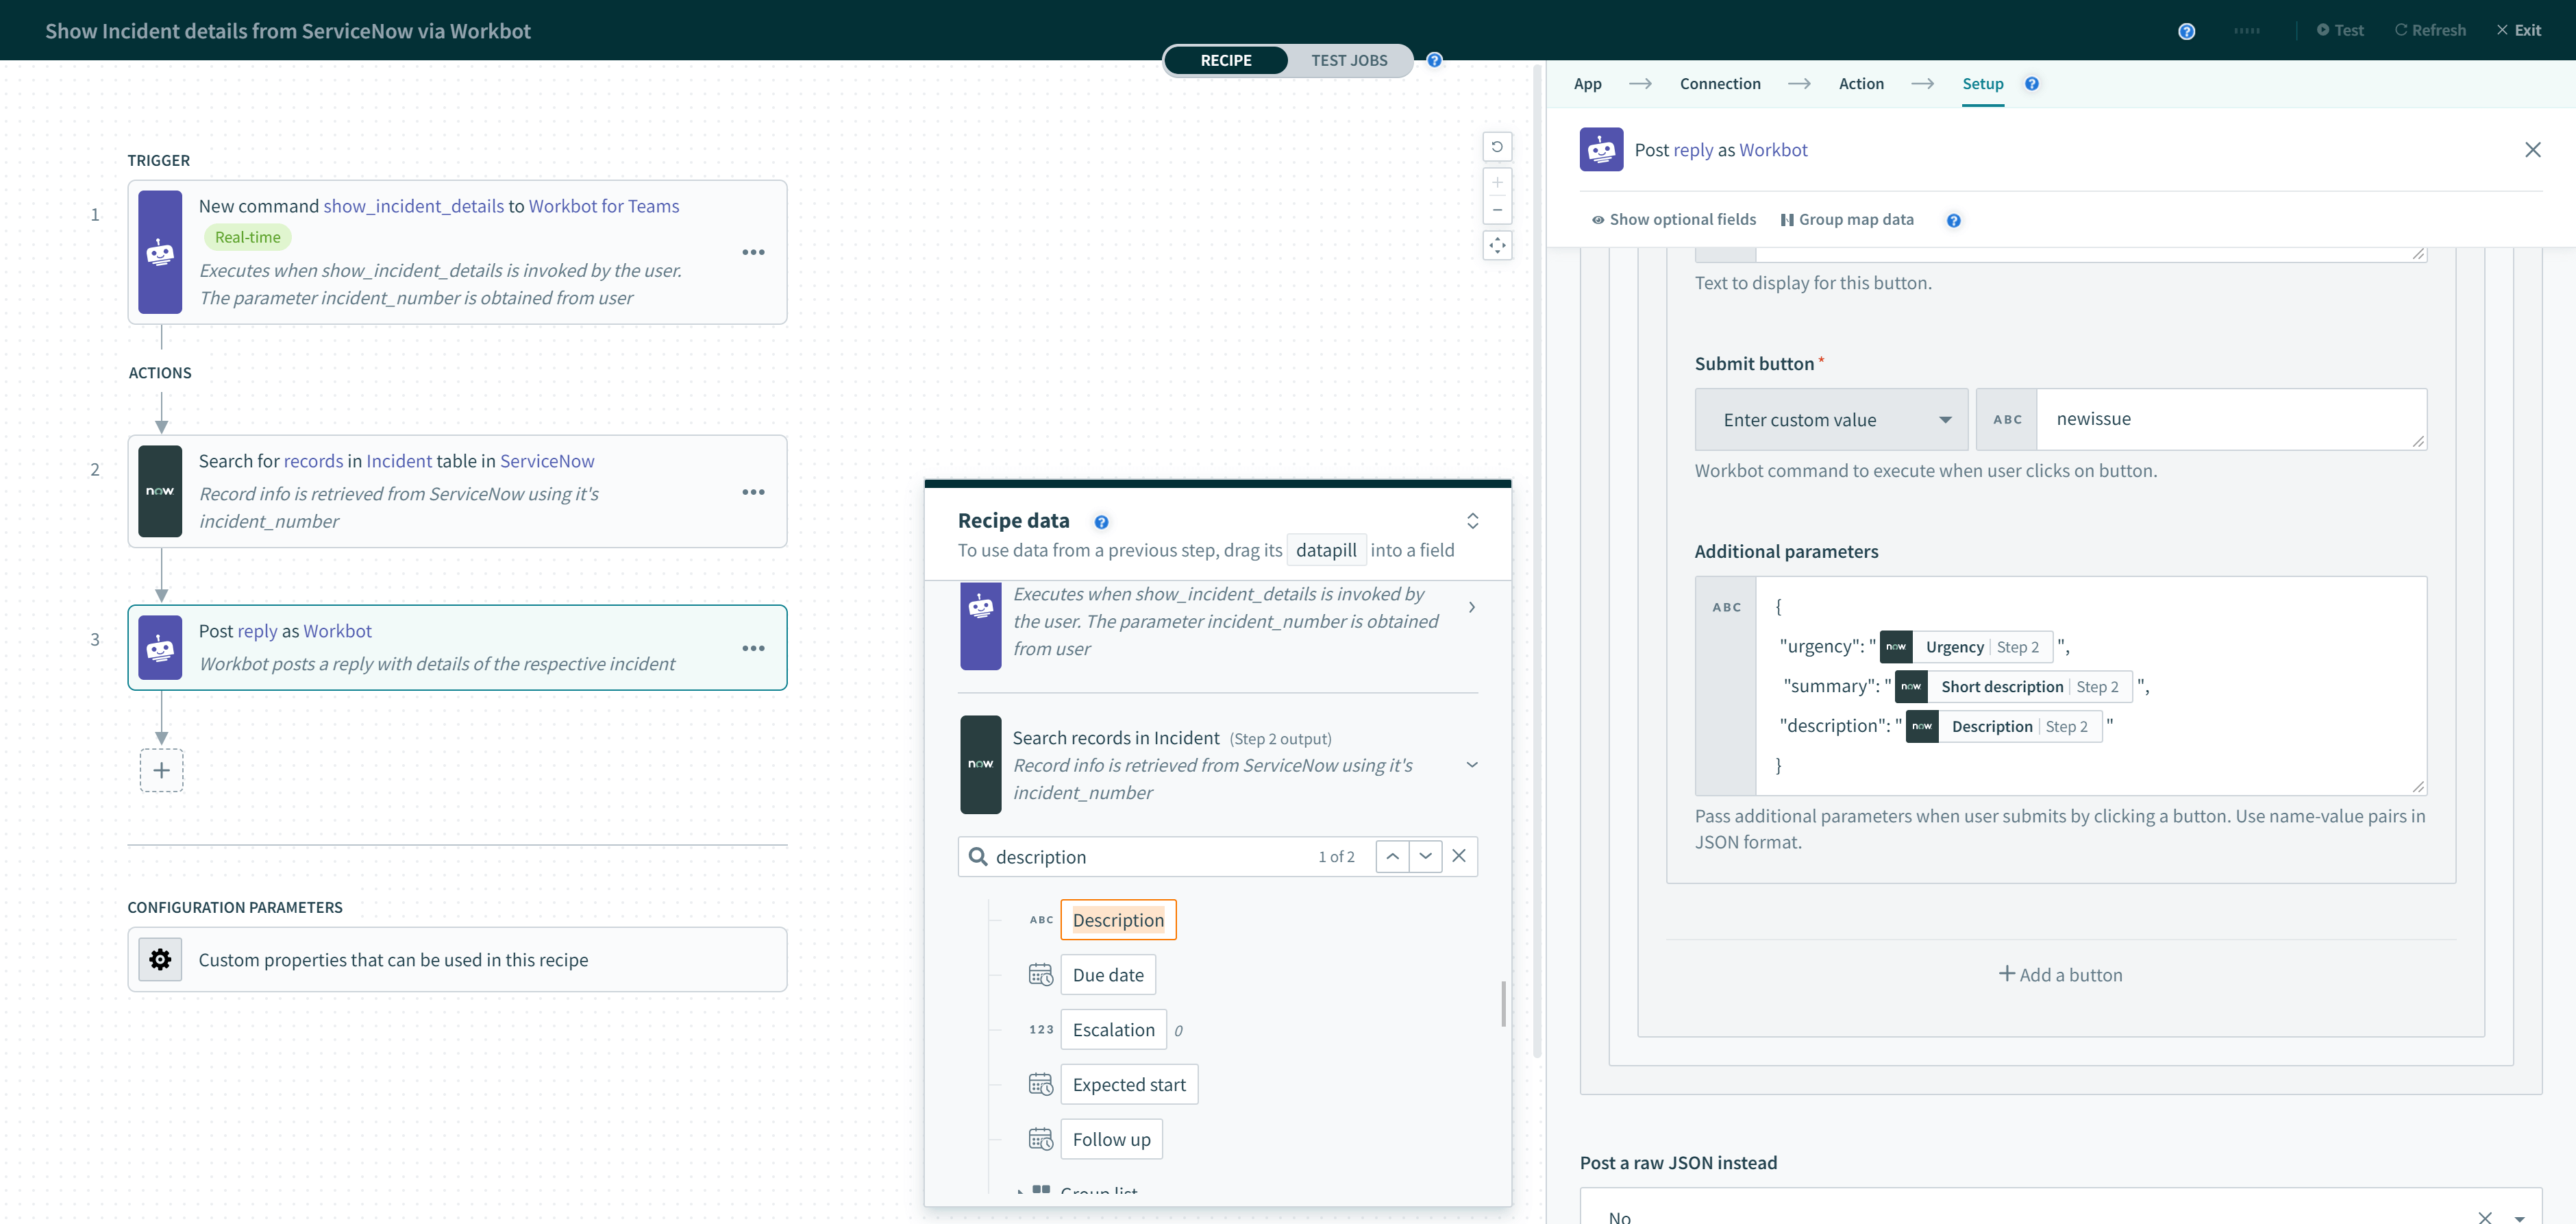
Advanced methods to pass parameter values
Parameter values can also be passed by buttons and task modules as they invoke a Workbot command. Typically, you use parameters to pass context to the invoked Workbot recipe.
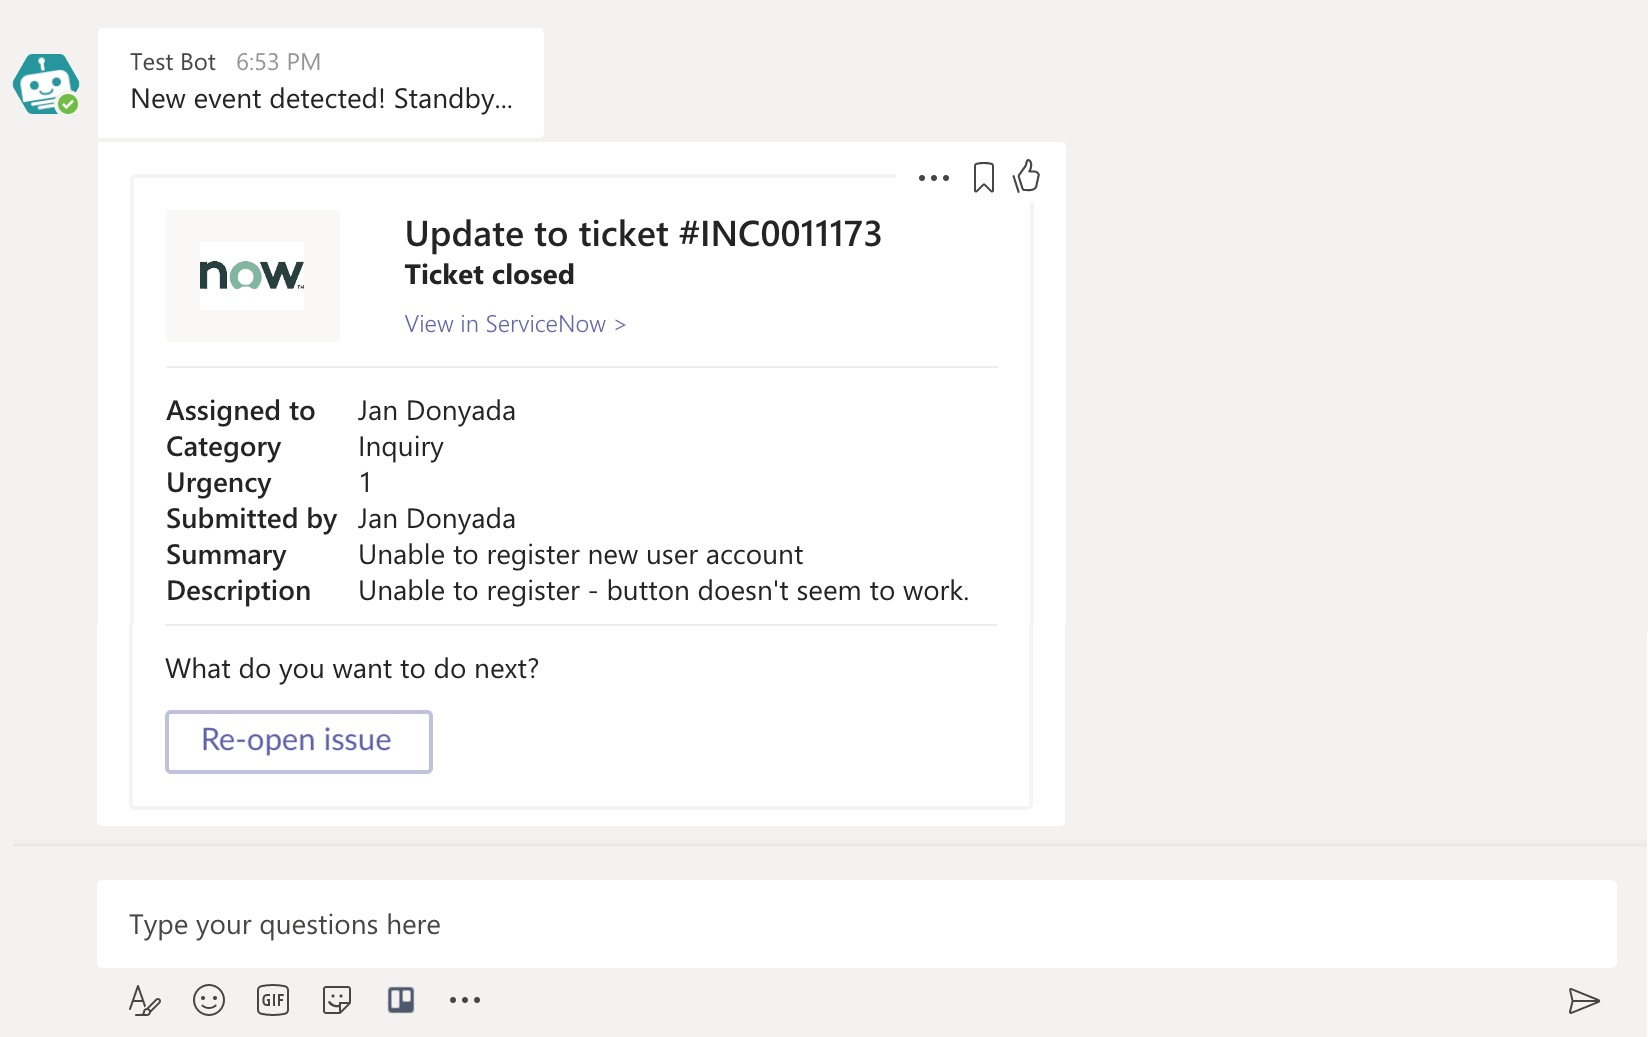 The 'Re-open issue' button not only invokes the 'reopen_issue' command - it's also passing parameters!
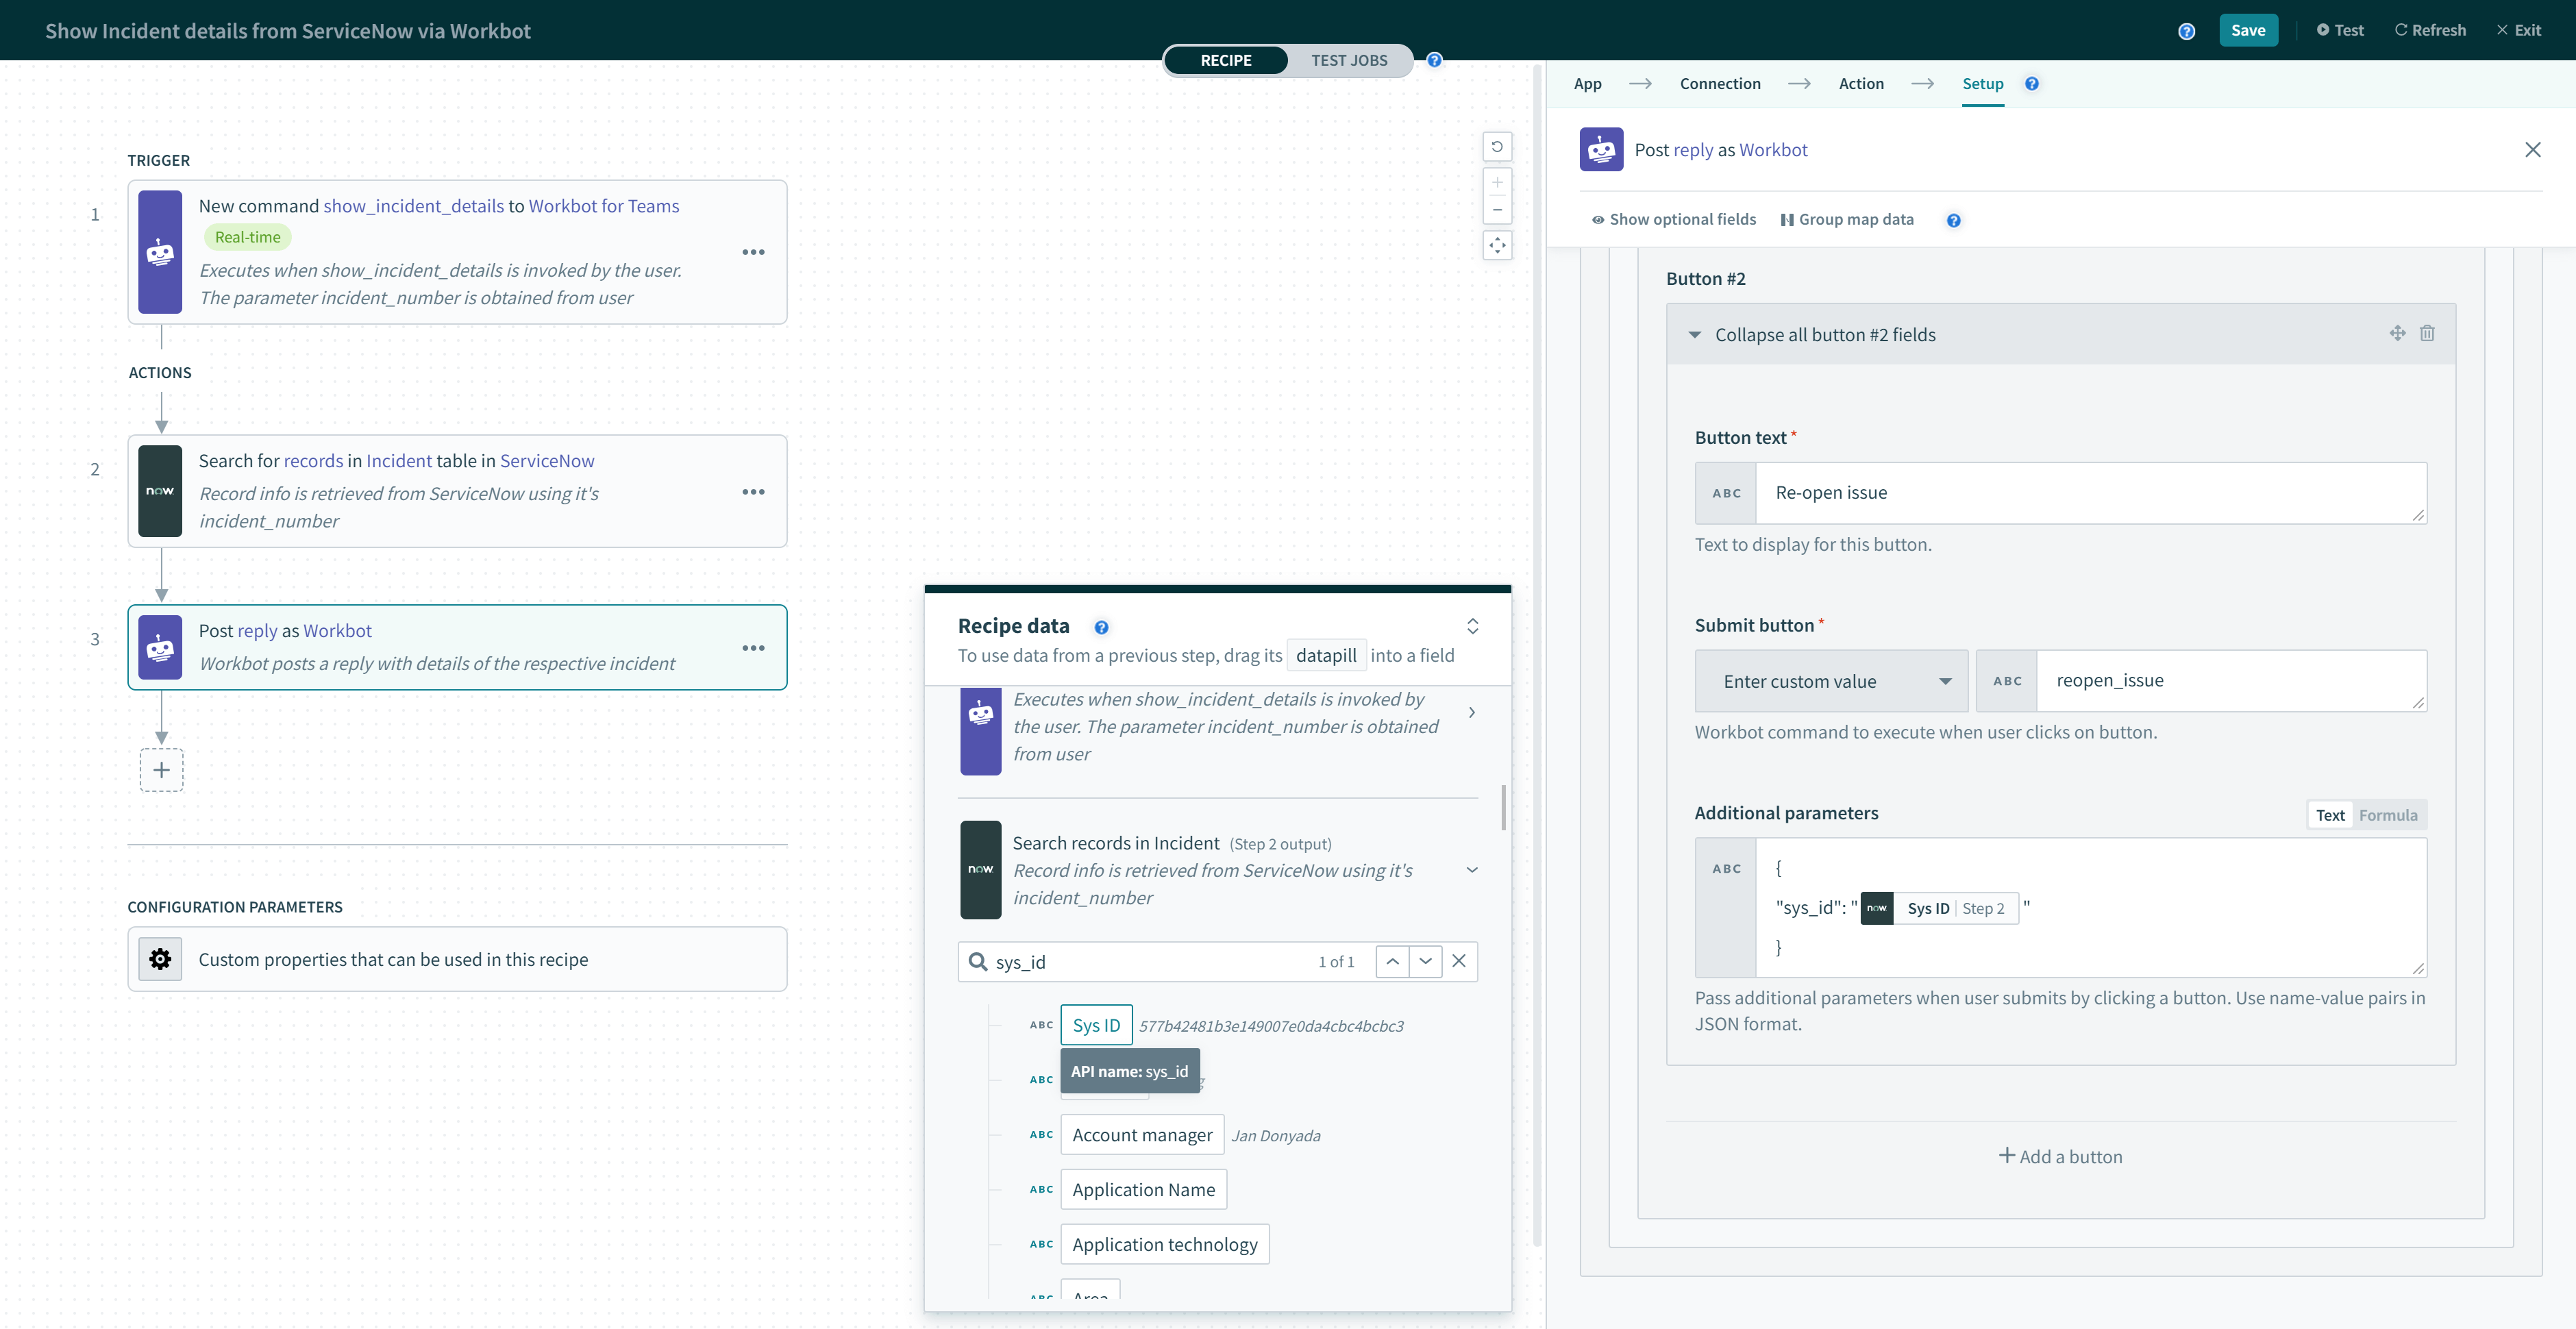 The 'Re-open issue' button is configured to pass the 'sys_id' so that the 'reopen_issue' recipe knows which issue to re-open
Another way to pass a parameter is by using a pick list Choice parameter.
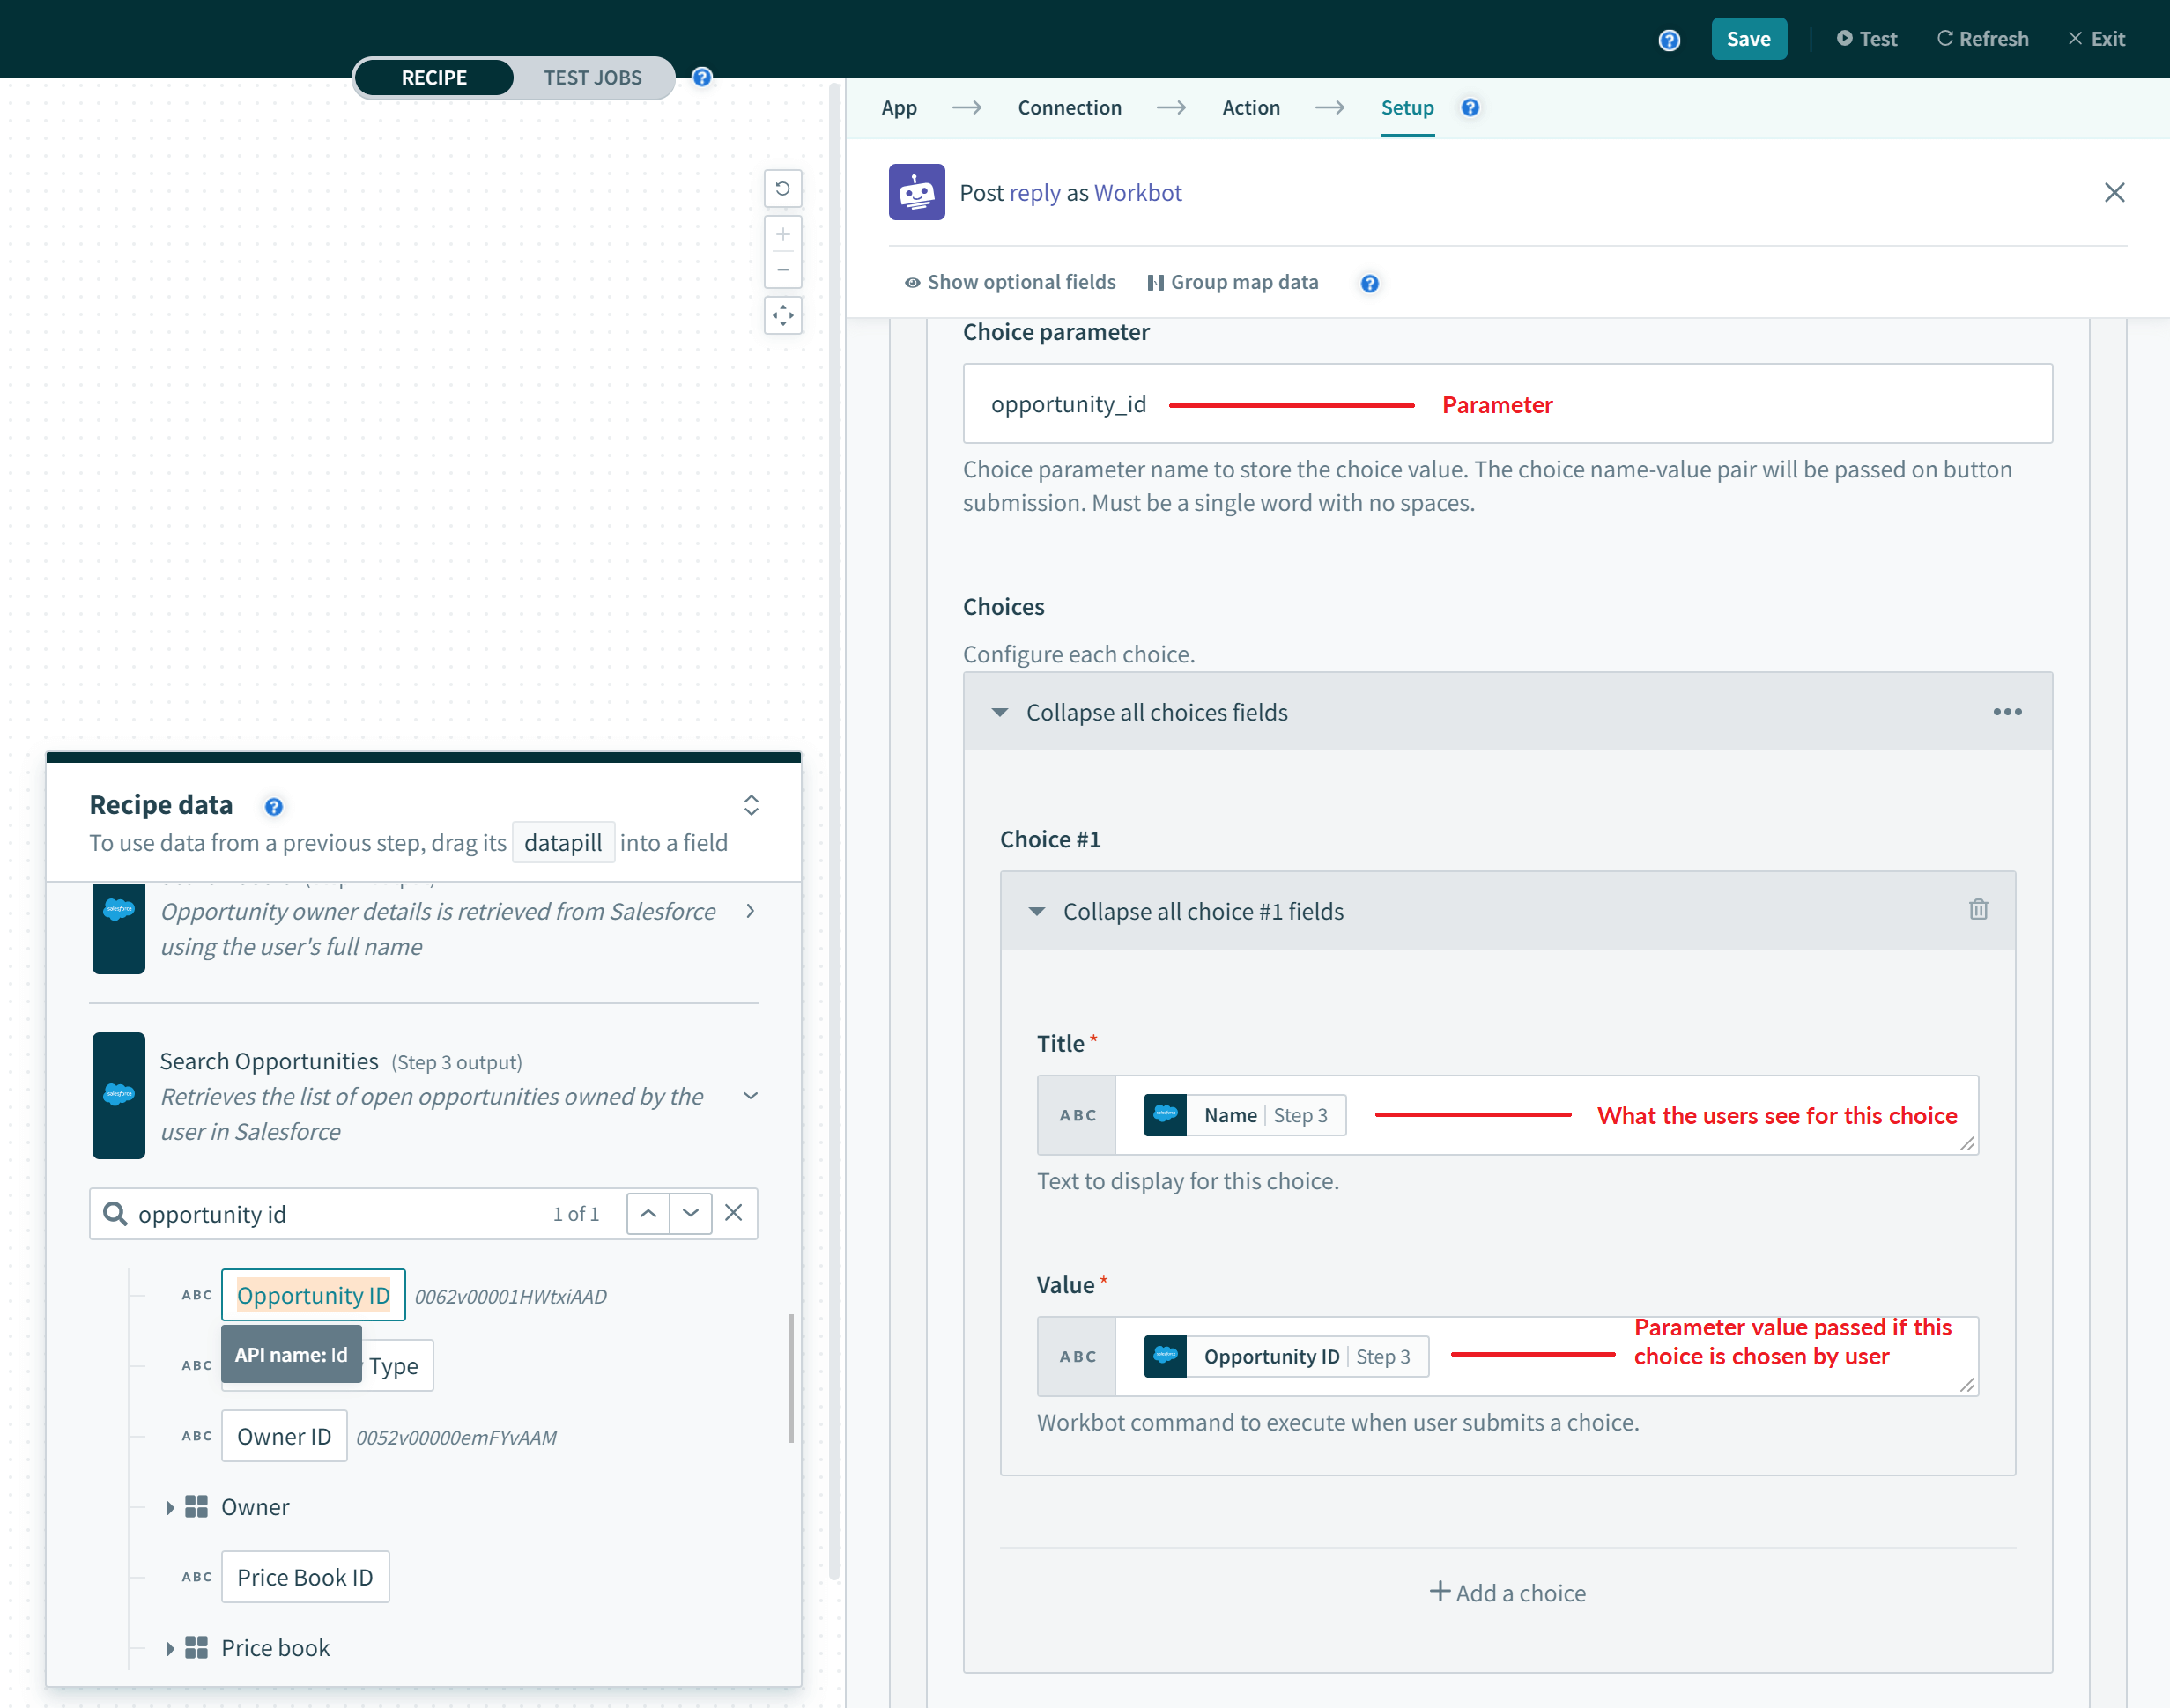 The choice parameter will take its value from a choice (if it's chosen)
The choice parameter is passed when a button from the same message is submitted (along with any other parameters the button may have).
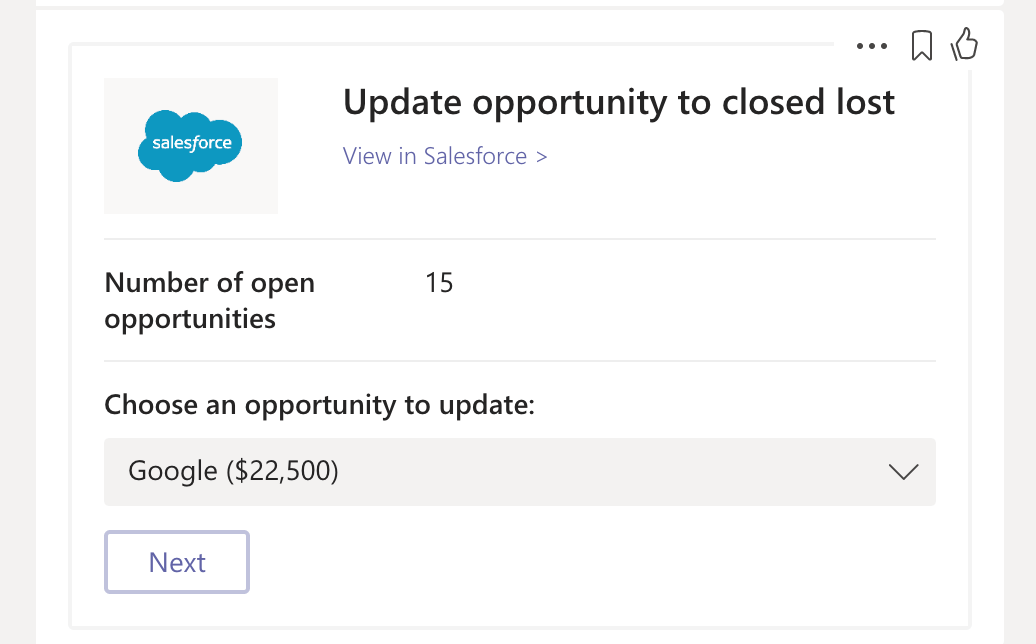 The 'Next' button also passes the 'opportunity_id' of 'Google' onto the command recipe that it invokes
Files for Enterprise Workbot
End users can upload files to Enterprise Workbots when file parameters are defined in the bot commands. These files are uploaded to the user's OneDrive for Business storage, and its data can then be used in follow-up recipe actions. The file portion of the trigger output looks like this:
| Output fields | Description | Example |
|---|---|---|
| contentType | Indicates that a file was uploaded to OneDrive and ready for download. | application/vnd.microsoft.teams.file.download.info |
| downloadUrl | OneDrive URL for fetching the content of the file. You can issue an HTTP GET directly from this URL. | https://download.link |
| uniqueId | Unique file ID. This will be the OneDrive drive item ID. | 1150D938-8870-4044-9F2C-5BBDEBA70C9D |
| contentUrl | Link to the file in Sharepoint. | https://contoso.sharepoint.com/personal/johnadams_contoso_com/Documents/Applications/file_example.txt |
| name | Name of the file | file_example.txt |
| file_comment | The message sent by the user along with the file upload. | This is an example file upload. |
Updating Workbots created before 30th Oct 2021
Enterprise Workbots created before 30th Oct 2021 typically would not have supportsFiles property set to true in their manifest. Learn how to update it.
New help message trigger
The New help message trigger executes when a help message is sent to your bot via DM or channel (when mentioned by the user, e.g. "@workbot help"). Use this trigger if you want to fully customize your bot's help message response, instead of utilizing the Workbot default help message.
It is recommended to pair this trigger with the Post reply action. The reply will then become the help message users will see when invoking help for your bot.
Only 1 New help message trigger recipe can be active at a time for each bot.
Reasons to use New help message trigger
It is highly recommended to customize your bot's help message based on its unique functionality. This is done by responding to a New help message event with a Post reply. The context contained within the trigger can be used to:
- Personalize the message to the user by using User ID
- Show different
helpmessages if the user is the bot admin or an end-user by using Is bot admin? - Provide alternative
helpmessages using text that the user submits along with theirhelpcommand, e.g.help Salesforce - Display bot commands, personal connections, and links to bot recipes and jobs
With the customized help message now defined within a Post reply action, you are now able to:
- Describe your bot's unique functionality in greater detail
- Include information from other apps (e.g. Salesforce, ServiceNow, Jira) that can be scoped to the user
- Build multi-step
helpflows that can open task modules or bring users to specific tabs
Inputs
No inputs required.
Outputs
| Field | Description | Example | |
|---|---|---|---|
| Help message text | Text supplied by the user that comes after `help`. | "@workbot help me with salesforce" ==> "me with salesforce" | |
| Personalized connections command | Command that can be used to display the user's personal connections. Use when defining the command to invoke in buttons or other interactive component. | connections | |
| Is bot admin? | True if invoking user is a bot admin, false otherwise. | true | |
| Bot commands (array) | Recipe ID | Recipe ID of bot command recipe. | 42 |
| Recipe name | Name of the bot command recipe. | Create Salesforce opportunity | |
| Command | Full command name | salesforce create opportunity | |
| Description | Command hint | creates salesforce opportunity | |
| Recipe URL | URL of recipe. | https://app.workato.com/recipes/42 | |
| Recipe jobs URL | URL of recipe jobs page. | https://app.workato.com/recipes/42#jobs | |
| Context | Microsoft Teams-related information, including message information, tenant/channel/team information, user information, and more. | ||
| Advanced | Parameter name for commands in choice sets | Use this pill in the Parameter field if a Bot commands array is used in a choice set. | |
| Submit command for commands in choice sets | Use this pill in the Submit button command field if a Bot commands array is used in a choice set. | ||
Help message priority
Help messages follow the following priority:
- Custom help in recipe
- Default help
Tab opened trigger
This trigger executes when a user opens a tab in your enterprise Workbot. To learn more about how tabs work, see Tabs.
Input
| Input field | Description | Example |
|---|---|---|
| Entity ID | Entity ID of the tab. Can be found in your app's manifest.json file. To learn more, see Tabs. Must be 1 word. Case sensitive, and must be identical to tab's entityId in manifest. | PendingPTORequests |
Output
| Output field | Description | Example |
|---|---|---|
| Entity ID | Entity ID of the tab. | PendingPTORequests |
| Context | Microsoft Teams-related information, including message information, tenant/channel/team information, user information, and more. | |
New message trigger
PUBLIC BETA
This trigger is in public beta. Public beta features are those that have passed the development phase and are now ready for customer use. Our goal is to gather your input to ensure their reliable release in upcoming enhancements.
During the public beta release, Workato may update its functionality or change its availability to customers without prior notice.
 New message trigger
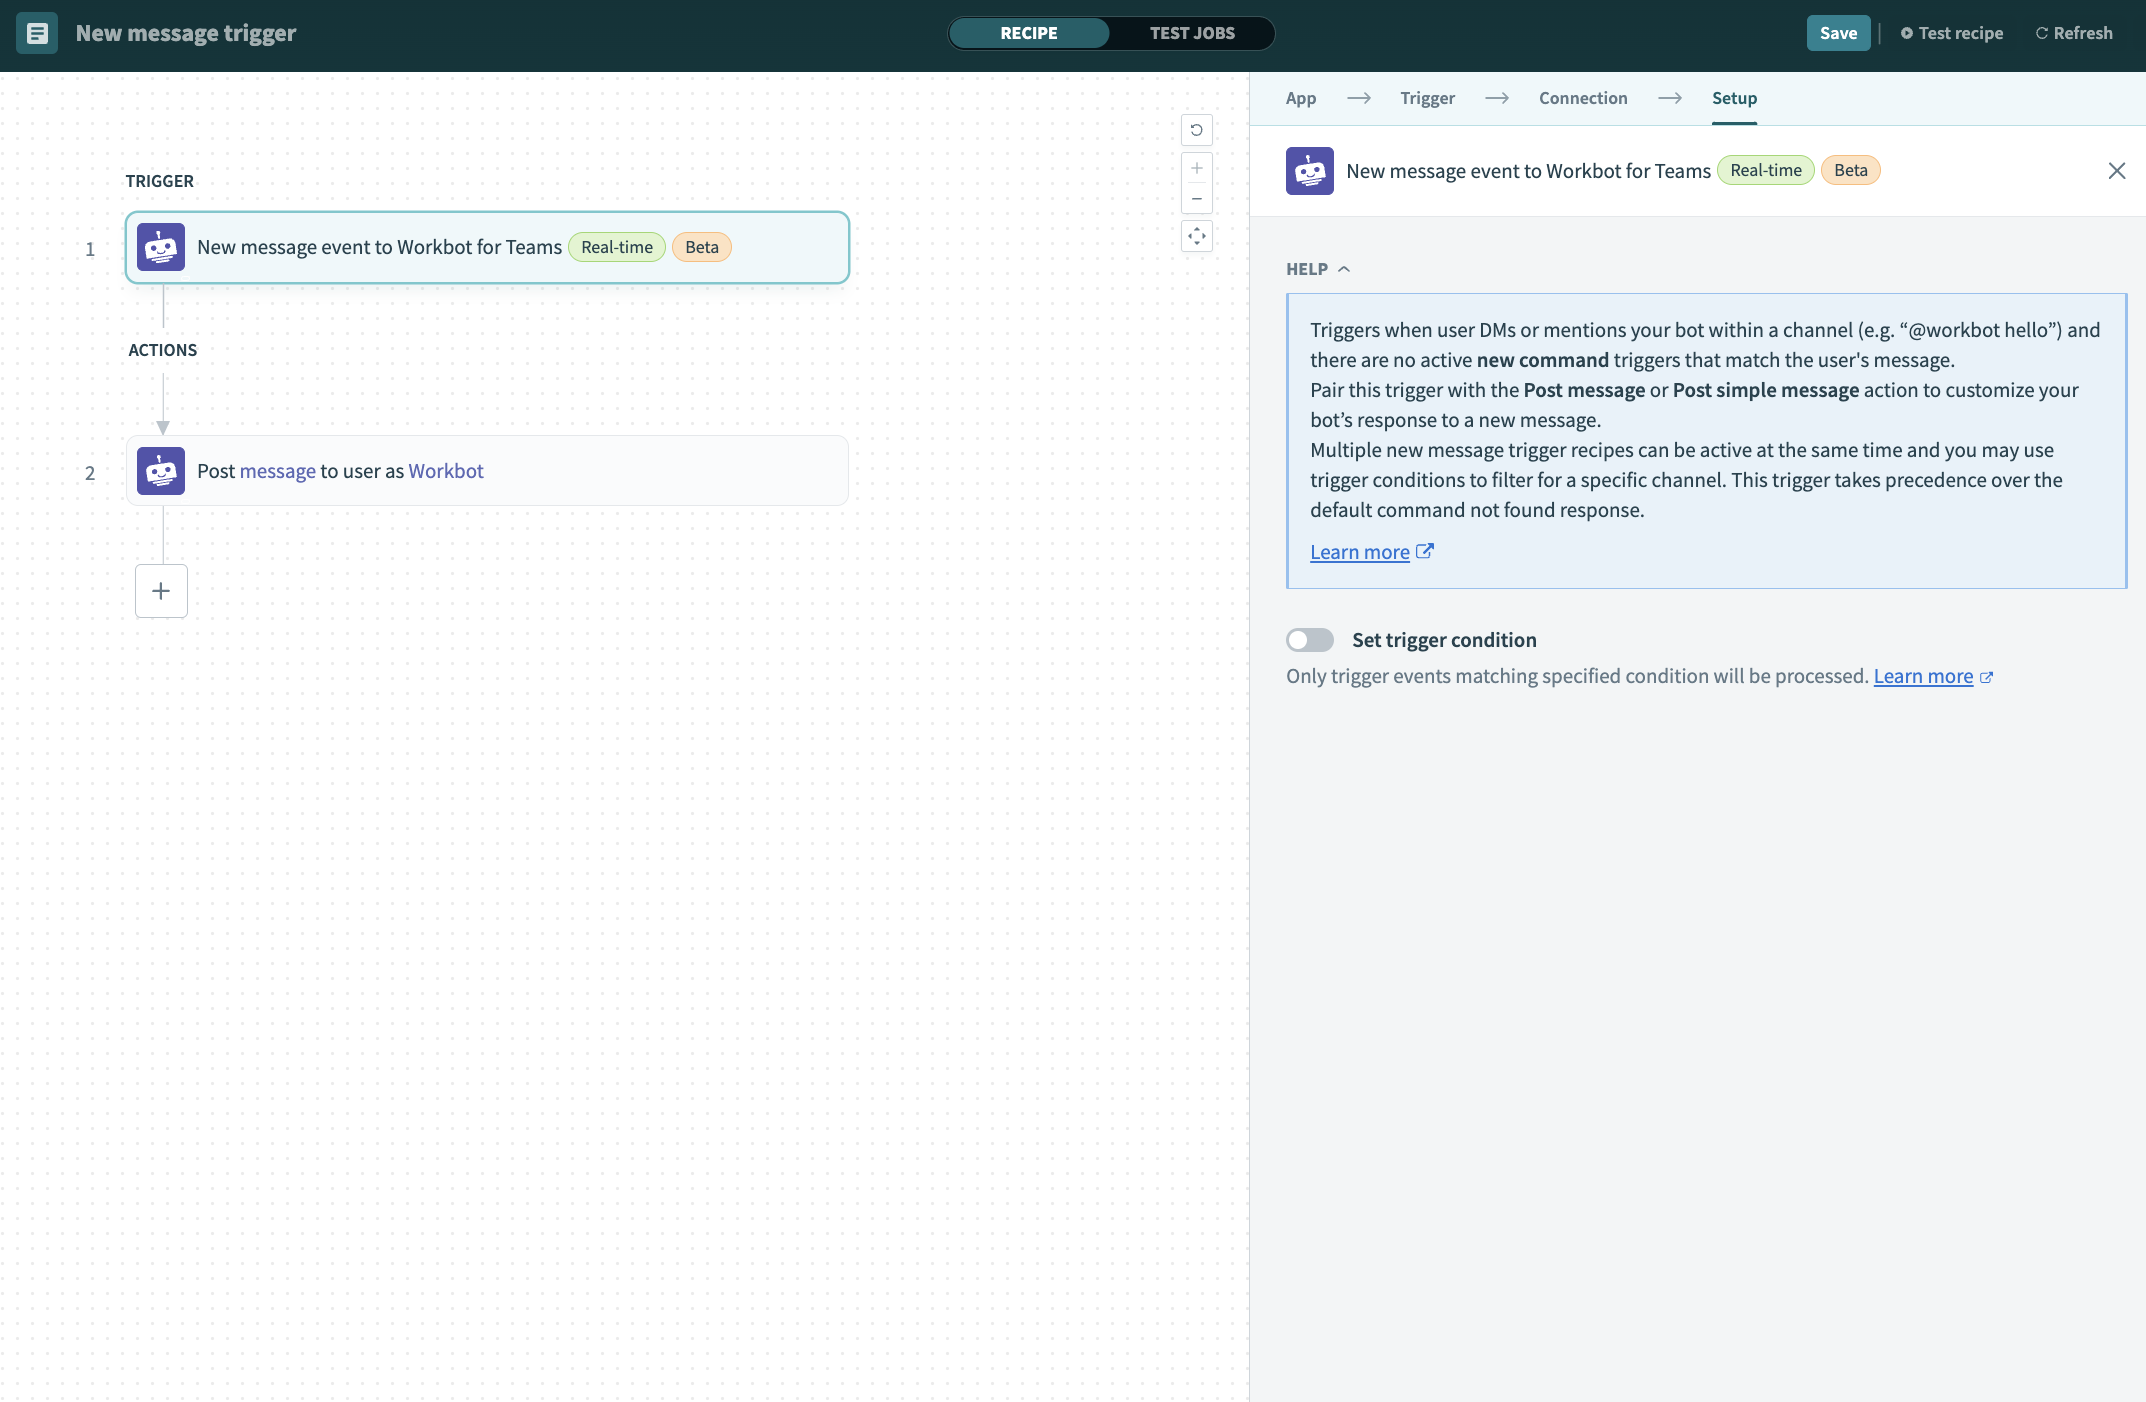
The New message trigger activates when a user sends a direct message (DM) to Workbot or mentions Workbot in a channel, provided there are no active new command triggers that match the user's message. If no specific command triggers are set up to respond to that message, the New message trigger runs.
For example, if you send @workbot hello to Workbot and have no active recipes configured with the hello command, the New message trigger picks up the event and proceeds with the workflow defined in your recipe. This trigger takes precedence over the default Command not found response.
This trigger is compatible with Post message and Post simple message actions. Use it to customize your Workbot’s response to a new message. You can have multiple recipes with the New message trigger active at the same time. Additionally, you can use trigger conditions to filter for a specific channel.
Input
This trigger does not require user input. However, you can set a trigger condition to configure Workbot to respond to messages in one or more specific channels only.
Output
| Field | Description |
|---|---|
| Message ID | The ID of the user-supplied message. |
| Message Text | The message content. This is the message the user sends to Workbot. |
| Timestamp | The time the initial message was sent to Workbot. |
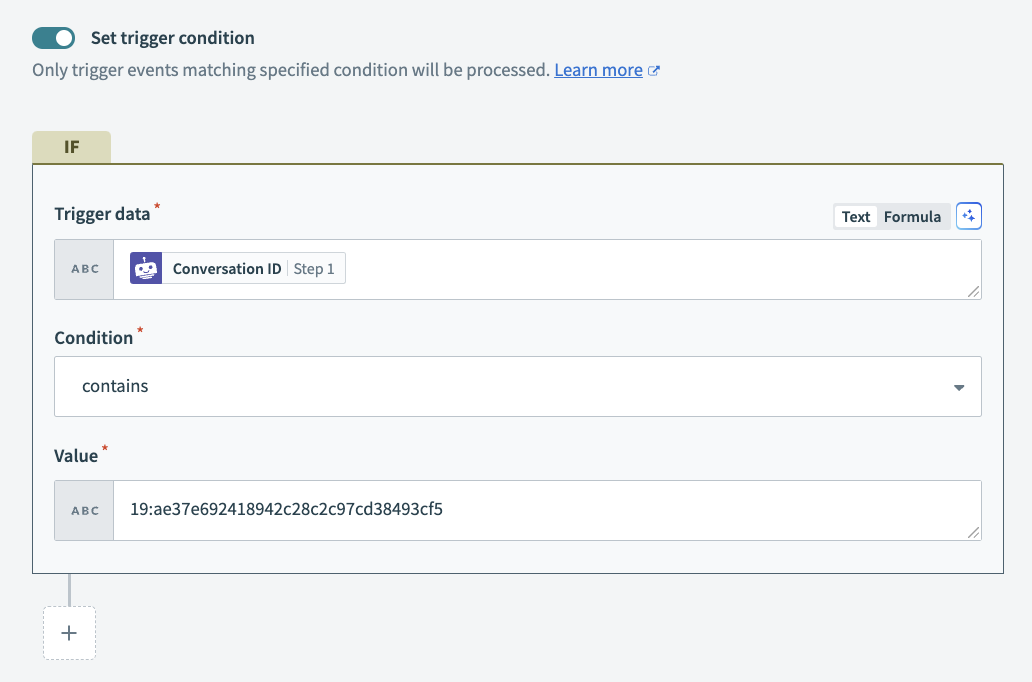
| Conversation ID | The unique ID of the conversation. This is typically the channel ID and associated metadata. |
| Conversation Type | The type of message between the user and Workbot. For example, channel or groupchat. |
| Sent From ID | The ID of the user who sent the message to Workbot. |
| Sent From Name | The name of the user who sent the message to Workbot. |
| User ID | The user ID of the user who sent the message to Workbot. |
| Recipient ID | The ID of the Workbot that received the message. If your workspace has multiple Workbots, this value helps differentiate between them. |
| Recipient Name | The name of the Workbot that received the message. If your workspace has multiple Workbots, this value helps you differentiate between them. |
How it works
This trigger is useful in situations where your users interact with Workbot, but their input does not match any existing commands. It enables you to create more interactive and dynamic conversations between Workbot and your users.
The following example pairs the New message trigger with a Post message action. This action allows users to complete their tasks by selecting an option, such as filing a ticket, searching for records, or talking to support.
 Configure an IF condition to control where Workbot can post messages
 Select a message recipient
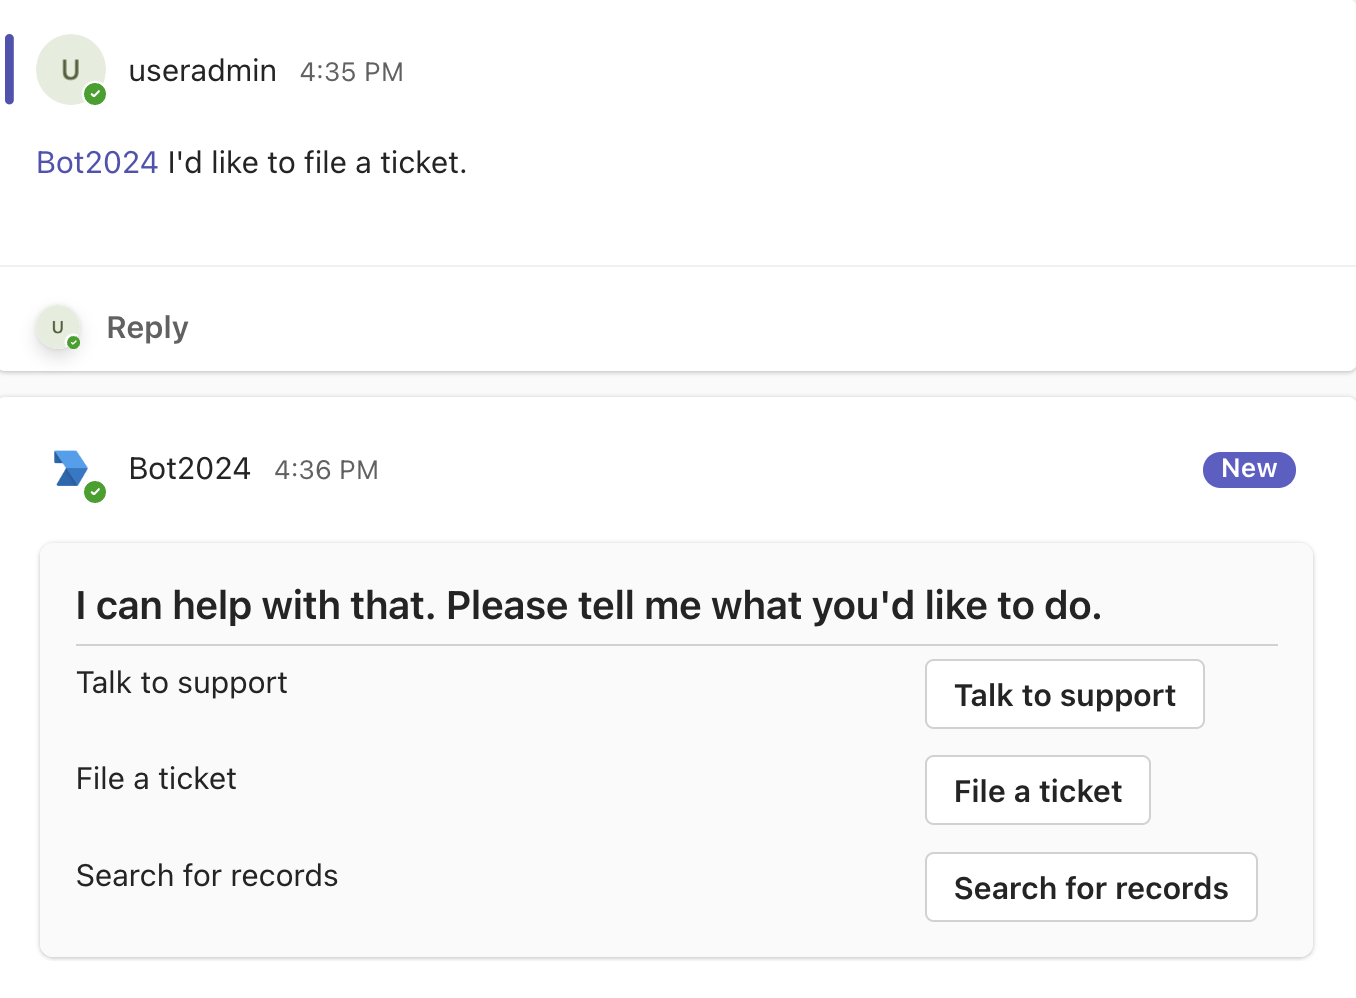 Workbot responds to user prompts
How to obtain a channel ID
A channel ID corresponds to a specific channel in Microsoft Teams. You can use the channel ID to configure trigger conditions that filter events by channel and control which channels prompt a response from Workbot. This ensures Workbot's actions are relevant to the context of those channels.
Complete the following steps to obtain a channel ID from Microsoft Teams.
Go to the channel where you plan for Workbot to monitor messages.
Click the ... (ellipsis) on the right of the channel name.
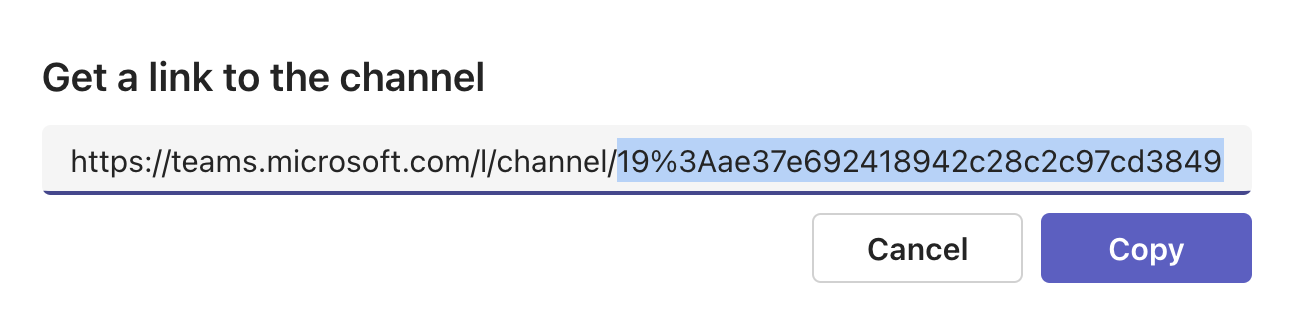
Click Get link to channel.
Copy the channel ID from the modal. The modal displays the entire link to the channel. The channel ID is included in this link as a path parameter following the channel path segment.
 Copy the channel ID
In the following example, everything between channel/ and /%5BDocs is the channel ID.
https://teams.microsoft.com/l/channel/19%3Aae37e692418942c28c2c97cd38493cf5%40thread.tacv2/%5BDocs%5D%20Test?groupId=55563081-256e-4922-8f4e-e2a760294320&tenantId=76a89289-583c-40a2-9709-e076eed5d680Decode the channel ID. You can use a tool such as Dupli Checker or a similar tool for this purpose.
For example, the following string should change from this:
19%3Aae37e692418942c28c2c97cd38493cf5%40thread.tacv2To this:
19:ae37e692418942c28c2c97cd38493cf5@thread.tacv2Split the resulting string to remove the metadata from the channel ID. The metadata include the @ symbol and everything after it.
For example, the string:
19:ae37e692418942c28c2c97cd38493cf5@thread.tacv2Should be split to:
19:ae37e692418942c28c2c97cd38493cf5The result is the channel ID you can use to configure the trigger condition.
Last updated: